Hatch Embroidery 3 - parametrize embroidery objects
Introduction
This tutorial explains how to parametrize an embroidery object with the Hatch Embroidery 2 or 3 embroidery software. In more simple terms, you will learn define the way in which a shape will be stitched.
We will introduce the most important elements in our opinion. So, some parameters are just mentioned, but not explained with an example, others are not even mentioned. As the official documentation is also quite minimalist, you will have to try and think a little or even learn by reading other articles or watch videos on YouTube and elstitchhere.
This text has been translated from the a french version made for Hatch 2 and needs some fixing, e.g. some of the illustrations.
Filling shapes with embroidery
Conceptually, we can distinguish between two major types of shapes: areas and outlines. Areas are some sort of polygon with or without holes. Outlines refer either to the borders of an objects or to all sorts of lines
There are several types of stitches in embroidery. The article Embroidery stitch type explains this concept in detail. Hatch defines several. Here are the most important:
- Tatami stitches are used to fill large areas with lines that may be slightly curved according to tatami-fills in the manual. You can choose from lots of fill variants (patterns) and also play on the density between the lines and the distance of the points.
- Satin stitches are used to fill objects with parallel stitches. The manual explains that it is “well suited for thicker borders and outlines. It is also well suited to narrower shapes where the stitches span the full width of the column. The satin stitches are almost parallel. Because there is usually no needle penetration to break up the filling, the satin stitch creates a high-quality shiny effect.”
- Motif stitches (fill by patterns) allow filling surfaces that are generally larger with various patterns
- The cross-stitch fills with cross stitches
- There are a variety of curved fills, such as contour fill, ripple fill (spiral), or even stipple (points)
- Outline stitches (outline stitches in their manual) include straight stitches , satin lines, etc.
The following picture shows how to fill a circle shape with a ripple fill.

It is quite easy to switch from one type of fill stitch to another. Obviously we lose some settings.
The following image shows the fill types available to digitize a line and also includes satins.

When you digitize an element, the resulting embroidery object will be defined with your default values (set in Auto Fabrics and Embroidery settings in the Software Settings menu). Below, we will show how to re-parametrize the most important types of fill (tatami, satin and line). This first concerns stitching densities and angles. Then it is necessary to ensure that the tatami or satin type fills have an underlay. Hatch offers a type of underlay depending on the fabric, so you can change that too. Then there are parameters that transform the "look" and we will show some of them, e.g. Hatch 3 introduced a nice "Hand Stitch" effect.
Setup
Before (re)configuring it is advisable to define the fabric on which the pattern will be embroidered. By default, it is cotton, the preferred material for machine embroidery.
- Menu
Design Settings -> Auto Fabric - You can select a fabric (recommended for novices if you use a fabric other than cotton and benefit from default settings adapted to the fabric. You can also add your own fabric, see
software settings -> Manage Auto Fabrics
Since we often embroider emojis on sweaters, our default values are based on wool, but we add some extra compensation.

You then can choose an auto fabric default in the Toolboxes -> Customize Design.It is important to tick Apply auto fabric in the popup. If you select OK the settings are applied to the current design, if you select SAVE the settings will be the default for future digitizing work.

Understanding that different fabrics need different settings is crucial. This particularly concerns: underlay, stitch density and pull compensation. The other embroidery parameters defined in Embroidery settings are fine for beginners.
Tatami type objects
Tatami fill
We show some tweaks with the Noto "Dragonface" font emoji. Here are the files:
- dragon-face-noto.clipart.svg Almost original clipart
- dragon-face-noto.clipart.png Imported raster clipart
- dragon-face-noto-hatch.EMB Design File
- dragon-face-noto-hatch.PES Machine file
- dragon-face-noto-hatch.PNG Simulation
To define or modify a tatami fill, follow at least steps 1-4. The rest is optional. You can keep the default options, especially if you did choose an appropriate auto fabric.
- Select the selection tool (
Selectarrow at top left) - Select the embroidery object you want to re-set.
- Select the
Filltab in theObject Propertiespanel (the latter can be displayed withMenu Window->Dockers->Object PropertiesorEdit Objects->Object Propertiesif absent) - Select "Tatami" in the
Filltab of the Object Properties panel - Change the pattern of the tatami in "Patterns" in this same panel (here, in the figure below, we took an irregular fill)
- Check the density in the "Stitch Settings" at the bottom of this panel. A
Spacingof 0.40 defines the distance every two lines (not between 2 lines!). In other words, it is 0.2mm distance between the lines, or even 5 lines/mm). 0.4mm is a fill that covers the fabric well provided you have defined an underlay. - Check the correct choice of textile in the bottom bar ("wool" in our case). Changing fabrics impacts density, underlay, and compensation.
- Check the color
- Check underlay, angle, locking, thread cutting, compensation, etc by selecting "
Stitching" in the object properties panel (see below) - Add special effects in the "
Effects" panel.

Stitching parameters for tatami fill
The Stitching tab of the Object Properties panel allows you to set a number of important parameters:
Underlays
Unless otherwise indicated, we always put an underlay for a tatami. By default it is another tatami embroidered in a different angle and much lighter (2.5mm distance between each 2nd line = 1.25mm between lines)
Optionally, you are allowed to add another underlay, e.g. an inset contour line called "Edge run".
Pull compensation
As a general rule, a pull compensation must be added (typically around 0.2 mm). If you have chosen the destination fabric correctly, you can leave the default value. If it is important that the embroidery is without "holes" (for example for a dense logo) you could add 0.1 to 0.2 mm, e.g. we most often use 0.3mm.
The embroidery angle
Modifying the angle is easier here than with the direction line found in the Reshape tool in Edit Objects
Connectors
Here you can define when the machine should stitch locking stitches. As soon as the distance between the two objects is more than 2mm, this is done by default.
Trims
Trims work like locking stitches and in addition the thread is cut. By default, no cut is defined if an object is near. The reason is that each cut pulls and ties use an even wider knot. So having too many cuts can distort the embroidery.
Auto Jump
You can define the maximum length of a stitch (12.1mm by default)
Special effect settings for tatami fill
The Effects tab of the Object Properties panel allows you to define a number of special effects.
Hand Stitch (introduced in Hatch 3)
Hand stitch adds some irregularity to a fill so it looks a bit more like manual embroidery. Newly introduced in Hatch 3, it is the first item in the list.

As seen in the next picture, you may have to add extra compensation - or like in this case - embroider satin columns on top of the fill (like in the simulation above)

Various parameters allow changing the aspect. Read the section on Hand stitch effect in the official user guide.
- Roughness can be achieve by adding more variety to the length of stitches and to the angles
- Mass allows to diminish or augment mass.
Feather edge
This option allows to creates jagged edges, i.e. another typical feature of manual embroidery. Feather edges can be added to either side or both. Sides are defined with respect to the tatami "lines" defined embroidery direction.
Max widthsets the width of the jagged edgeRaggednessdefines the amplitude of the irregularity
Gradient fill
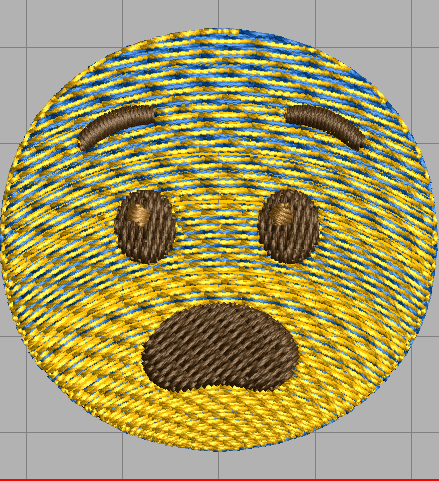
Allows to define gradients according to 4 profiles. Here is an example from the fearful face emoji 😨. To obtain a gradient, you have to work with at least two colors, the solution we have chosen here.
Files:
- fearful-face-noto.clipart.ori.svg
- fearful-face-noto.clipart.svg
- fearful-face-noto.clipart.png
- fearful-face-noto-hatch.EMB
- fearful-face-noto-hatch.PES
- fearful-face-noto-hatch.PNG
- fearful-face-noto-colorblend-hatch.EMB
- fearful-face-noto-colorblend-hatch.PES
- fearful-face-noto-colorblend-hatch.PNG
To obtain a gradient effect, two superimposed tatami fills are created. The simplest method is to copy/paste the embroidery object in question (with CTRL-C / CTRL-V, the EDIT menu or right-click in the sequence panel).
- The first face will be blue, will be dense at the top and light at the bottom
- The 2nd face will be yellow, will be light at the top and dense at the bottom.
Preparation
- We first digitize the image according to the rules we explained in Hatch Embroidery 3 - auto-digitizing: The yellow face in "click-to-fill"; eyes and mouth in "click-to-fill without holes"; eyebrows in "click-to-turning fill"; the pupils in "click-to-turning fill". We transform the angle of direction of the eyes, otherwise the satin will be lost within the stitches of the tatami fill.
Procedure to add a gradient to the face
- Copy/paste the yellow face, move the copy to the very top of the stack (in front of the copied yellow face). To do this, you can use the small arrows at the bottom of the sequence panel.
- Add a blue color by clicking on the "Threads" button at the bottom right. Then select the first face and put it in blue by clicking on the blue added to the palette at the bottom of the screen.
- Now choose
Object Properties -> Gradient Fill - Profile 2for the blue because it is dense at the top and light at the bottom - For the yellow, we will choose profile 1 which is dense at the bottom and light at the top.
- You must check that "Travel on edges" in the "Fill" tab is checked (otherwise you can see the auxiliary lines)
- We also uncheck the underlays in the "Stitching" tab, since we already have two layers and the underlays can disturb the visual aspect
- We densified the spacing at the beginning of the gradients to 0.20 millimeters with the parameter
min. spacing (to be checked) - We add a Florentine effect (that is to say a curved tatami which we will explain later).
We should in principle add an outline to compensate for the fact that we no longer have an "edge run", but it is always a difficult exercise because there will be a contraction effect on the face and the outline risks being detached, despite the stretch compensation settings applied to the face. Only add outlines if you are willing to test your design before using it for real...

This design should definitely be tested, because in our experience gradients behave very differently depending on the software. Wilcom's documentation is quite terse.
Color blending as an alternative to gradient
As an alternative, we could also have used color blending, available in edit mode.
- Select the object, in our case the head
Toolboxes -> Edit Objects -> Create Color Blend- Then, following the same logic, you have to choose a bottom layer (embroidered first) and a top layer. For both, the corresponding profile is indicated.
The result is a sequence consisting of two embroidery objects. Both solutions should be tested to see if there is a difference. The manual gradient method has the advantage that other colors can be added. Personally, I prefer to embroider a background color first with a light tatami without an underlay.
Both options do not define the function of the gradient. You can just choose between 4 profiles, unlike Stitch Era which allows you to define curves for 1, 2 or 3 colors.
Radial / Curve fill
Under this heading one can transform a tatami fill into radial tatami (concentric circles) or Florentine, a curved tatami.
Radial fill
A radial fill creates a concentric tatami which is pretty enough to embroider various balloons for example. (example to do).
Hole widthsets the width of the hole in the middleHole heightdefines its height.
By editing the object you can move the hole outside the surface of the embroidery object and obtain an effect similar as the Florentine.
In addition, use radial fill to objects like tires. Sometimes automatic digitization does not produce the appropriate radial fill.
Florentine effect
This effect makes it possible to curve a tatami slightly. According to the manual "Florentine Effect contours fill stitches along a digitized guideline. Stitches follow the line but maintain uniform density and needle penetration patterns".
- To obtain it, you must select an object, then check
Florentine effectin thisEffectstab. Hatch sets a default curvature. - We can modify this curvature by editing the object. So select the object and click on a
Reshapebutton (top left next to the selection arrow or inEdit Objects) - An inconspicuous curve that indicates curvature will be visible. In our case, there are three control points, left, right and one under the entry exit symbols (to select it, we had to move the entry/exit).
By playing with these three points, the curvature can be modified. You can add control points to this line, but we did not.

There are other ways to fill an object with curvature, including "radial fill" (above), "elastic embossed fill" (below), "contour fill" and "ripple fill". The last two are not tatami and are found in the "Fill" tab of the "Object Properties" panel. The Official Manual describes these various options well.
3D warp
Allows you to give an aspect of concavity or convexity to an object. It works especially well with patterned fill (so not tatami).
Elastic embossed fills
This last option allows you to create textured fills that follow an outline. You can choose from several patterns, adjust their size, spacing, etc.
Satin type objects
Hatch 2 includes the usual satin stitch settings. We will introduce the most important ones (density, underlays, etc.) with an example. Let us first recall that the "Object Properties" panel must be displayed, for example with Design Settings -> Object Properties .... Next, select one (or more) embroidery object(s), then change the settings in this panel.
The "Herb" Emoji example that we are going to modify has already been introduced in the section example of semi-automatic digitization and adaptation of the drawing of the grass emoji in the article Hatch Embroidery 3 - auto-digitizing. Here is just the link for the EMB design file
The "Fill" tab
In the first Fill tab, you can adjust the density, measured as distance between the tips (e.g. density = every two lines). By default, Hatch adopts an auto fabric setting defined in Design Settings -> Auto Fabricif it was set.
For "wool" (wool) we get 0.37, about 5.4 lines / mm which is quite dense.
The auto-split box is checked and it will split a satin if it gets too wide. We advise you to always leave this check mark.

Special effects for satin
The Effects tab allows the following settings, which we won't explain too much for the moment, since they are settings for intermediate users:
Hand stitch effect
- Works like the hand stitch effect for tatami, i.e. creates random mass, random (small) angles and random length.
Feature edge
- Allows to set an irregular border
Gradient fill
Radial curve fill
- Allows to fill an object by a radial satin around a hole of variable width.
- Alternatively, we can define a slightly curved design (called "Florentine effect" which we have already seen for the tatami). The effect is quite nice.
Elastic embossed fill
- Allows you to fill a satin with various patterns
- You can then adjust various parameters (size, repetition, etc.)
Stitching tab for satin
Some parameters of this 3rd tab are important for a good result. Hatch prefills them based on your fabric choice, if you did set it in Customize Design -> Auto Fabric.
Underlayes
Hatch 2 allows defining two underlays. As a general rule, at least one is needed. You can avoid underlays if you stitch over another fill or if you work with wt 12 threads.
For the choice of "wool" fabric, Hatch decides to make a double-zizag underlay for the stems of the leave. It will raise them well. We could have added a center line underlay and we did....
On the other hand, the embroidered "light reflections" on the embroidered tatami leaves are embroidered with a simple central line, a good choice which will stabilize the fabric without adding heaviness to it. It should be ensured that these last satins do not go in the same direction as the tatami, so it is necessary to change the angle of the tatami if necessary or find another solution.
Compensation
Hatch 2 set a fixed value of 0.2mm for the wool fabric. Maybe not enough. Finally, we left this choice.

The connectors
The connectors work the same way as those of the tatami. We can decide under which conditions we should not tie a knot before a jump We leave the faults, i.e. Hatch will program a lock if the distance between two objects is greater than 2mm. Too many knots will stiffen and distort the embroidery.
Automatic trim
Defines in which conditions the thread must be cut. We leave them the defects. i.e. the thread is cut if the distance between two objects is greater than 2mm. Too many knots plus a cut will stiffen and distort the embroidery. So it is often better to cut threads with small scissors.
Auto Jump
Maximum stitchdefines the maximum stitch length (corresponds to the machine limit). Beyond that, the machine will slow down and make a "slow" jump.Jump lengthdefines the maximum length of a "normal" satin stitch
Objects of the outline type
We introduce the most important parameters to fill an object of type outline which can also be called "line". A line fills most often with a repeated straight stitch (e.g. a triple run) or with a satin stitch.
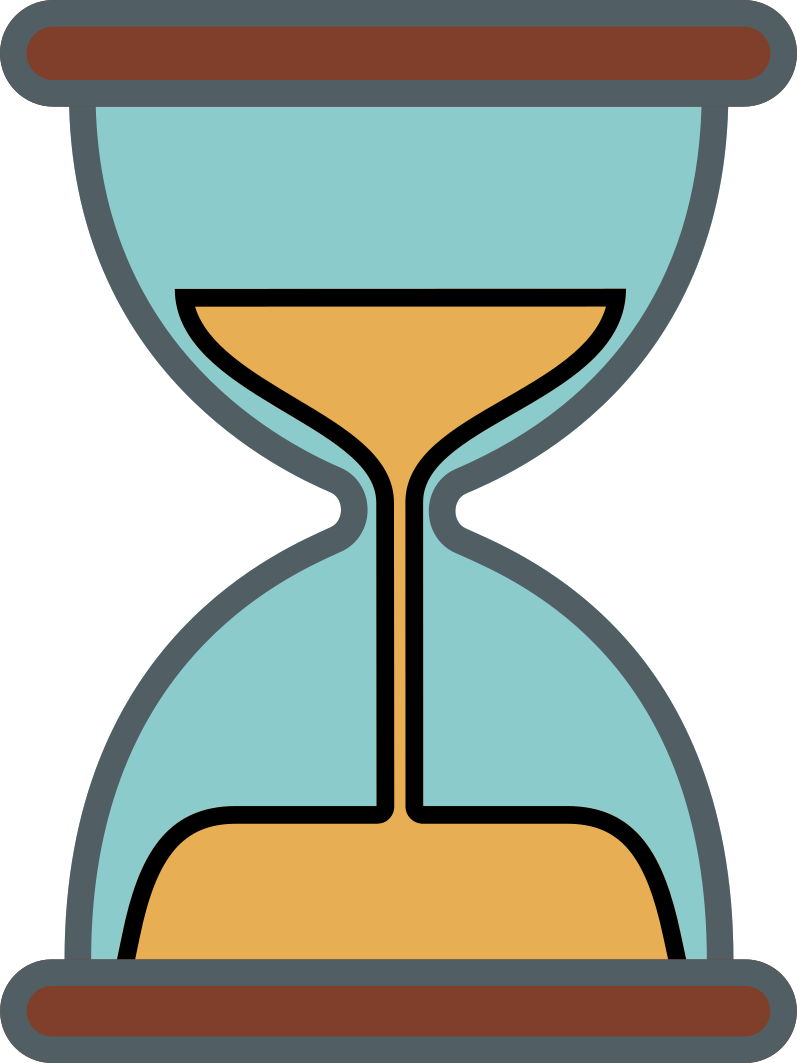
We will show some setting possibilities using the Noto (Android 8) "hourglass not done" emoji. We explain how it was digitized in the article Hatch Embroidery 3 - auto-digitizing.
Files:
- hourglass-not-done-noto.ori.clipart.svg (Original drawing not used)
- hourglass-not-done-noto.clipart.svg (drawing without gradients, no transparencies, etc.)
- hourglass-not-done-noto.clipart.png (file at import as Artwork)
- hourglass-not-done-noto-hatch.EMB (file design)
- hourglass-not-done-noto-hatch.PES (machine file in PES format)
- hourglass-not-done-noto-hatch.PNG (simulation)
To fill a line you can choose between several straight stitches, satin, point E (blanket), patterns. One cannot always switch between all these variants. Hatch does not allow switching from a straight stitch to a satin if there is no room with respect to its neighbors (this has to be investigated...).
Settings for straight stitches and variants
The Outline tab of the Object Properties panel lets you choose between single run, triple run, backstitch and stemstitch straight stitches. Most parameters are shared and there is no "effects" tab.
Single run
is a simple straight stitch without the possibility of repeating
- You can define the length and the minimum length (used in the curves if
Variable run lengthis checked)
Triple run
is a classic front-back-front triple stitch
- Same length settings as single run above
Backstitch
is a more muscular form of the triple point which separates the threads a little according to the small diagram that we see in the interface. There is a 5 strokes option, so a kind of double triple point spread. In the image above we see the simulation. This stitch is popular for redwork.
The following parameters can be set:
Length: 2.5mm by default, which is pretty tight.Thickness(Thickness): 0.2 by default, about the width of a wireOverlap: 30%. The more we increase the more the line gains in volume,Strokes(Number of strokes): 3 = forward-backward-forward or 5 = one more round trip

Stemstitch
is a kind of twisted zigzag along the axis and tight.
Discussion:
Curiously, the repetition of a line is missing. The above options only allow repeating between two points. It seems to be difficult to turn a straight stitch into satin in some contexts. Probably Hatch 2 wants to reinforce a certain distance, i.e. when the line is too close to an object, the transformation is refused (to be checked).
The stitching tab for outlines
You can define when you no longer need to tie knots and when you need to cut the thread.
Pattern stitch settings
(to do)
Parameters for satin stitches
The satin stitch, used as a fill for a row, shares more or less the same parameters as the fill for a satin column. So we can define densities, effects and underlays. It lacks the possibility to define the shape of the tips (flat, rounded, arrow,...).
Outline tab
Auto spacingandManual spacingdefine the density. Default around 0.36mm distance between 2 lines (depends on fabric setting)Widthallows to define the width of the satin. As a general rule, do not go below 1.5mmOffsetallows you to define whether to embroider along the line or offset (this can be useful for creating borders)- The
Calligraphytick defines an irregular shape as the name suggests
Effects and Stitching tabs
For the "effects" and "stitching" tab see the discussion of satin fill. It is always important to define an appropriate underlay, by default we advise a center line followed by a zig-zag underlay.
Optimization and smoothing
Optimizing means embroidering a design with a minimum of cuts and skips.
Smoothing means simplifying the outline of a shape.
Rearrange with close joins
You can optimize the stitching order of a series of objects with the "apply closest joins" operation. According to the manual, “patterns are sewn more efficiently when the connectors between objects are short. It also tends to reduce the number of thread cuts in a design. The software has a Closest Join method that can be applied during scanning and/or after editing. When enabled, entry and exit points of objects are automatically brought closer during scanning.”
We explain the principle with the microbe example of the Android/Google emoji font. Here are the files of this digitization (quite mediocre by the way)
- microbe-noto.clipart.svg
- microbe-noto.clipart.png
- microbe-noto-hatch.EMB
- microbe-noto-hatch.PES
- microbe-noto-hatch.PNG
Here is an optimization procedure:
- In some cases it is necessary to rearrange the order in the sequence (either by moving the objects, or with the tool
Sequence by Selection Orderwhich will sort the objects according to the order of the selection In our example we have opposed the light green tentacles. - Next, select the objects to optimize. CTRL-Selection adds to selection, SHIFT-Selection selects range in
Sequencepanel - Then we optimize:
Toolboxes -> Edit Objects -> Apply closest join - To verify, uncheck the
TrueViewicon in the menu bar. This displays the entry and exit points as well as the jumps. We can clearly see the pink jumps for objects 4,5,6,7 and 8 in the screenshot below. - Hide jumps if possible. In our case we embroider the body and the border of the microbe after stitching the tentacles.
In some cases it is necessary to adjust the entry / exit points, but in the meantime think first of optimizing the order. For the microbe in the figure below, we just put some tentacles in opposition and then we embroidered a tatami on the hidden threads. As we embroider the green stitches last, we just added a thread cut.

The result is quite correct as far as optimization is concerned. On the other hand, we could improve digitization of the tentacles. To start, we just re-digitized the green border and the tentacles as "turning fill" (satin). That should be in the version we make available in the files.

Manually change entry/exit points
To see the connectors, you have to uncheck TrueView and make sure with View->Show Design that all the codes of interest are displayed, so in particular, the connectors (entry and exit points).
Select then Reshape(icons top left) orToolbox-> Edit Objects -> Reshapeor shortcutHputs us in edition for the selected object.- With the mouse, you can move the exit point, visualized with a red cross (be careful, you have to drag on the cross and not the point which is below, the cursor should turn into a hand)
- Same for the entry point (green diamond)

Smoothing
Sometimes an imported object contains too many corners, sometimes the digitization creates too many corners. In this case, it is advisable to try smoothing.
- Select the object(s) in question
ToolBox -> Auto-Digitize -> Smooth Shapes ....- You can leave the default smoothing value. If the smoothing is too strong, return with CTL-Z and decrease the value.
To further refine a shape, it must be edited with Reshape, see the article Hatch Embroidery 3 - edit embroidery objects