CorelDRAW GEM for Hatch Embroidery: Difference between revisions
mNo edit summary |
m (→Intro) |
||
| (18 intermediate revisions by the same user not shown) | |||
| Line 2: | Line 2: | ||
|is_part_of_syllabus=Machine embroidery | |is_part_of_syllabus=Machine embroidery | ||
|is_part_of_module=Hatch Embroidery | |is_part_of_module=Hatch Embroidery | ||
|do_not_show_sub_page=No | |do_not_show_sub_page=No | ||
|status=to improve | |status=to improve | ||
| Line 10: | Line 9: | ||
|difficulty=beginner | |difficulty=beginner | ||
|see_also=Computerized embroidery, | |see_also=Computerized embroidery, | ||
Hatch Embroidery 3 - auto-digitizing, | Concepts of computerized embroidery | ||
|pages_module=Hatch Embroidery 3 - auto-digitizing, | |||
Hatch Embroidery 3 - parametrize embroidery objects, | Hatch Embroidery 3 - parametrize embroidery objects, | ||
Hatch Embroidery 3 - edit embroidery objects, | Hatch Embroidery 3 - edit embroidery objects, | ||
CorelDRAW GEM for Hatch Embroidery, | CorelDRAW GEM for Hatch Embroidery, | ||
|cat_syllabus= | |cat_syllabus=Hatch Embroidery | ||
|prequisite=InkScape | |prequisite=InkScape | ||
}} | }} | ||
[This text was machine translated from french with some slight editing. It needs some extra work] | |||
== Intro == | == Intro == | ||
[https://hatchembroidery.com/coreldraw/CorelDRAW GEM for Hatch Embroidery] is an "add on" for the [[Hatch Embroidery]] embroidery software. It includes the 2021 Standard edition of Corel | [https://hatchembroidery.com/coreldraw/CorelDRAW GEM for Hatch Embroidery] is an "add on" for the [[Hatch Embroidery]] embroidery software. It includes the 2021 Standard edition of CorelDRAW (we will use the short "Corel") plus the interface. In Switzerland, its price is $249 including VAT. In France and other countries, it will be necessary to add VAT. A priori, the software can be installed on three computers and be used on one at a time. | ||
This extension allows you to manipulate vector designs and digitize them into embroidery objects. The "standard" edition of | This extension allows you to manipulate vector designs and digitize them into embroidery objects. The "standard" edition of CorelDRAW is a good drawing tool. The "add-on" includes an automatic digitizing procedure of the drawing (or selected objects) which includes a mechanism to eliminate large overlaps. Then, you can also use Hatch's auto-digitizing tools to transform vector paths imported into Hatch into embroidery objects. These features are very '''handy for digitizing logos, emoji or other clip-art in vector format''' (SVG, AI, CDR, etc.). They '''are also suitable for graphic designers who prefer to first create a precise design''' before transforming its elements into embroidery objects. | ||
Compared to software like Stitch Era that integrate drawing software, the features of the "bridge" from CorelDRAW to Embroidery Hatch3 are limited to the essential: | |||
* In automatic conversion mode, you can just select one, several or all vector objects, then request a conversion. Hatch then automatically decides on the arrangement, the type of filling to choose, the removal of any overlaps or not, etc. Finally, if we preserve the vector objects, we can delete the resulting embroidery object, then use the "click-to-..." procedure to re-digitize (read [[Hatch Embroidery 3 - auto-digitizing|here]] ). This is particularly interesting for digitizing certain fine objects with a "center-line" method. | * In automatic conversion mode, you can just select one, several or all vector objects, then request a conversion. Hatch then automatically decides on the arrangement, the type of filling to choose, the removal of any overlaps or not, etc. It also may add travelling lines. Finally, if we preserve the vector objects, we can delete the resulting embroidery object, then use the "click-to-..." procedure to re-digitize (read [[Hatch Embroidery 3 - auto-digitizing|here]] ). This is particularly interesting for digitizing certain fine objects with a "center-line" method. | ||
* In semi-automatic digitizing mode, vector objects can be digitized one by one, or in groups. As there is a bug in "Remove Overlaps" which allows to manage overlays in embroidery objects, we advise to manage overlays beforehand in Corel. | * In semi-automatic digitizing mode, vector objects can be digitized one by one, or in groups. As there is a bug in "Remove Overlaps" which allows to manage overlays in embroidery objects, we advise to manage overlays beforehand in Corel. | ||
A design intended for embroidery is easier to digitize than a design intended for display or printing. After automatic digitizing of unsuitable drawings, many objects will have to be adapted quite extensively. So we suggest to prepare the drawing beforehand. This means, for example, that lines should be drawn as lines and not as thin polygons. | |||
In our opinion, the "CorelDRAW" add-on is very useful in situations where you want to base an embroidery on a vector drawing, either to gain precision, or to be able to recover various "clipart" (icons, fonts, logos , images) or to reuse various drawings. | In our opinion, the "CorelDRAW" add-on is very useful in situations where you want to base an embroidery on a vector drawing, either to gain precision, or to be able to recover various "clipart" (icons, fonts, logos , images) or to reuse various drawings. In many situation it is probably best to combine automatic conversion of most elements with semi-automatic digitizing of small element. | ||
A "free" alternative to purchasing this module is to export vector designs to high resolution PNG and then use the semi-automatic method described [[Hatch Embroidery 3 - auto-digitizing|here]]. To prepare the drawing and | A "free" alternative to purchasing this module is to export vector designs to high resolution PNG and then use the semi-automatic method described [[Hatch Embroidery 3 - auto-digitizing|here]]. To prepare the drawing and to export vector art to PNG, one can use the software [[Inkscape]] (free). | ||
== Setup == | == Setup == | ||
| Line 53: | Line 54: | ||
* Close Hatch and relaunch it: On launch Hatch 3 will detect Corel and ask you whether to link the two. Say "yes". | * Close Hatch and relaunch it: On launch Hatch 3 will detect Corel and ask you whether to link the two. Say "yes". | ||
== | == Simple use with examples == | ||
You can access the drawing module (CorelDraw) via a new "Graphics" button at the top left next to the "Embroidery" button. We will use the latter to return to the embroidery functionalities. These buttons can be hidden in a drop-down menu (under "Home") if you haven't stretched this panel. | You can access the drawing module (CorelDraw) via a new "Graphics" button at the top left next to the "Embroidery" button. We will use the latter to return to the embroidery functionalities. These buttons can be hidden in a drop-down menu (under "Home") if you haven't stretched this panel. | ||
| Line 63: | Line 62: | ||
There are two methods for digitizing vector drawings: | There are two methods for digitizing vector drawings: | ||
# '''Automatic conversion''' which imports the selected objects by managing overlay, positions, etc. | # '''Automatic conversion''' which imports the selected objects by managing overlay, positions, etc. | ||
# '''Semi-automatic conversion''' which consists of digitizing the objects one by one with standard Hatch tools | # '''Semi-automatic conversion''' which consists of digitizing the objects one by one with standard Hatch tools. | ||
Of course, you can combine the two methods... | Of course, you can combine the two methods... | ||
| Line 71: | Line 68: | ||
=== Automatic conversion === | === Automatic conversion === | ||
We will digitize the "bubbles" emoji (new in version 14) with a 100% automatic | We will digitize the "bubbles" emoji (new in version 14) with a procedure that is 100% automatic. | ||
[[image:bubbles-noto.clipart.svg|none|thumb|400x400px|link=Special:FilePath/Bubbles-noto.clipart.svg]] ([[Media:Bubbles-noto.clipart.svg]], download from SVG page, save with CTRL-S in your browser) | [[image:bubbles-noto.clipart.svg|none|thumb|400x400px|link=Special:FilePath/Bubbles-noto.clipart.svg]] ([[Media:Bubbles-noto.clipart.svg]], download from SVG page, save with CTRL-S in your browser) | ||
| Line 85: | Line 82: | ||
* The bubbles in white are in satin, embroidered over the blue background | * The bubbles in white are in satin, embroidered over the blue background | ||
[[image:hatch3-coreldraw-2.png|none|thumb|600px|Result of automatic | [[image:hatch3-coreldraw-2.png|none|thumb|600px|Result of automatic digitizing without retouching]] | ||
If we check (default) on | If we check (default) on <code>Keep</code>, each vector object is in the sequence (at the beginning) and we can therefore re-digitize them differently using the automatic digitizing tools in Hatch (see below). On the other hand, if you want to change the shape, you have to go back to CorelDRAW, modify the element in question, then just digitize this element (don't forget to delete the old embroidery object). | ||
Files: Search bubbles-noto-* (SVG, EMB, PES) | Files: Search bubbles-noto-* (SVG, EMB, PES) | ||
| Line 104: | Line 101: | ||
We show this method with a "face-with-open-eyes-and-hand-over-mouth" emoticon. | We show this method with a "face-with-open-eyes-and-hand-over-mouth" emoticon. | ||
[[image:face-with-open-eyes-and-hand-over-mouth.clipart.svg|none|400px|thumb|face-with-open-eyes-and-hand-over-mouth emoji (twemoji font)]] | |||
'''Import''' | '''Import''' | ||
| Line 115: | Line 114: | ||
[[image:hatch3-coreldraw-21.png|none|thumb|800px|Vector objects in the Hatch interface]] | [[image:hatch3-coreldraw-21.png|none|thumb|800px|Vector objects in the Hatch interface]] | ||
''' | '''Digitizing''' | ||
We proceed more or less as described in the article [[Hatch Embroidery 3 - auto-digitizing|Hatch Embroidery 2 - automatic digitizing]], except that the options are a little more limited. Click-to-fill will not create holes, since the selected element has none. So you have to deal with overlays later. | We proceed more or less as described in the article [[Hatch Embroidery 3 - auto-digitizing|Hatch Embroidery 2 - automatic digitizing]], except that the options are a little more limited. Click-to-fill will not create holes, since the selected element has none. So you have to deal with overlays later. | ||
To digitize a vector object, choose it in the sequence panel, then select the digitizing method. The following image shows | To digitize a vector object, choose it in the sequence panel, then select the digitizing method. The following image shows digitizing the hand with a tatami mat. | ||
[[image:hatch3-coreldraw-22.png|none|thumb|800px|Vector object semi-automatic digitization, hand, in tatami]] | [[image:hatch3-coreldraw-22.png|none|thumb|800px|Vector object semi-automatic digitization, hand, in tatami]] | ||
To add an outline around the hand | To add an outline around the hand there are several methods. We suggest to use the "add outline method". | ||
[[image:hatch3-add-outlines-1.png|none|thumb|800px|Créer des outlines avec "Créate Outlines and Offsets"]] | |||
Another method is more "manual": select the hand vector object, then select <code>Click-to-Outline</code> in Auto-Digitize tab of the toolbox. Results with a "manual" outline: | |||
[[image:hatch3-coreldraw-23.png|none|thumb|800px|Semi-automatic vector object digitizing, hand, in outline]] | [[image:hatch3-coreldraw-23.png|none|thumb|800px|Semi-automatic vector object digitizing, hand, in outline]] | ||
'''Management of | '''Management of superpositions a posteriori''' | ||
A priori, it would have been '''more convenient to manage overlays in Corel before moving to Hatch''' (see later in this article), but here we show how to manipulate embroidery objects. The hand is too large to be embroidered above the face. A priori, the procedure would be a simple click on "Remove Overlaps", but Hatch misses the target, punctures the vector drawing of the face and removes the hand. As a workaround, we used the following method: | A priori, it would have been '''more convenient to manage overlays in Corel before moving to Hatch''' (see later in this article), but here we show how to manipulate embroidery objects. The hand is too large to be embroidered above the face. A priori, the procedure would be a simple click on "Remove Overlaps", but Hatch misses the target, punctures the vector drawing of the face and removes the hand. As a workaround, we used the following method: | ||
| Line 136: | Line 138: | ||
Here in comparison, the result of an automatic digitization with "Convert". We see that the software makes a subtraction for the face, inserts it and then digitizes this version. | Here in comparison, the result of an automatic digitization with "Convert". We see that the software makes a subtraction for the face, inserts it and then digitizes this version. | ||
[[image:hatch3-coreldraw-25.png|none|thumb|800px|Contrast with | [[image:hatch3-coreldraw-25.png|none|thumb|800px|Contrast with auto digitizing (Convert in Corel)]] | ||
The result is just as good in this case, it would just be necessary to adjust the embroidery objects. | The result is just as good in this case, it would just be necessary to adjust the embroidery objects. | ||
''' | '''Finishing touches''' | ||
* We digitize the satin eyes: Select the eyes and choose <code>Click-to-turning-fill</code> | * We digitize the satin eyes: Select the eyes and choose <code>Click-to-turning-fill</code> | ||
* Change direction of hand points | * Change direction of hand points | ||
* Change the outline to dark brown | * Change the outline to dark brown and triple stitches. | ||
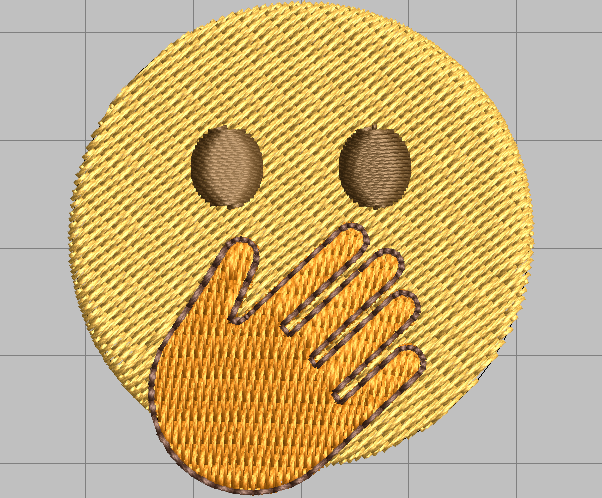
Here is the simulated result: | Here is the simulated result: | ||
| Line 151: | Line 153: | ||
* face-with-open-eyes-and-hand-over-mouth-hatch-... in the folder | * face-with-open-eyes-and-hand-over-mouth-hatch-... in the folder | ||
== | == Overlap management in CorelDraw and the bridge == | ||
One advantage of the CorelDRAW GEM "add-on" is to be able to digitize many precise drawings that exist in proprietary (AI, CDR, WMF) or open (SVG) vector format. The problem is that graphic designers use drawing techniques that overlap elements and we will have to manage that. There are several techniques for dealing with overlays: | One advantage of the CorelDRAW GEM "add-on" is to be able to digitize many precise drawings that exist in proprietary (AI, CDR, WMF) or open (SVG) vector format. The problem is that graphic designers use drawing techniques that overlap elements and we will have to manage that. There are several techniques for dealing with overlays: | ||
| Line 158: | Line 160: | ||
# We can have finer control if we take advantage of Corel Draw's features to eliminate them. | # We can have finer control if we take advantage of Corel Draw's features to eliminate them. | ||
# Then we can also eliminate the overlaps at the level of the embroidery objects. | # Then we can also eliminate the overlaps at the level of the embroidery objects. | ||
# Finally, you can always | # Finally, you can always redigitize an object in Corel or a vector object imported in Hatch. Importing often modifies the original objects. | ||
=== Automatic | === Automatic overlap management === | ||
Hatch 3 automates the handling of | Hatch 3 automates the handling of overlapping objects and seems to do a decent job as already seen in the example discussed at the start. However, we regret not being able to specify the management method as in Stitch Era which has three modes: (a) eliminate all overlaps (b) eliminate the important ones (c) eliminate nothing. Hatch automatically takes option (b) and eliminates all important overlaps. | ||
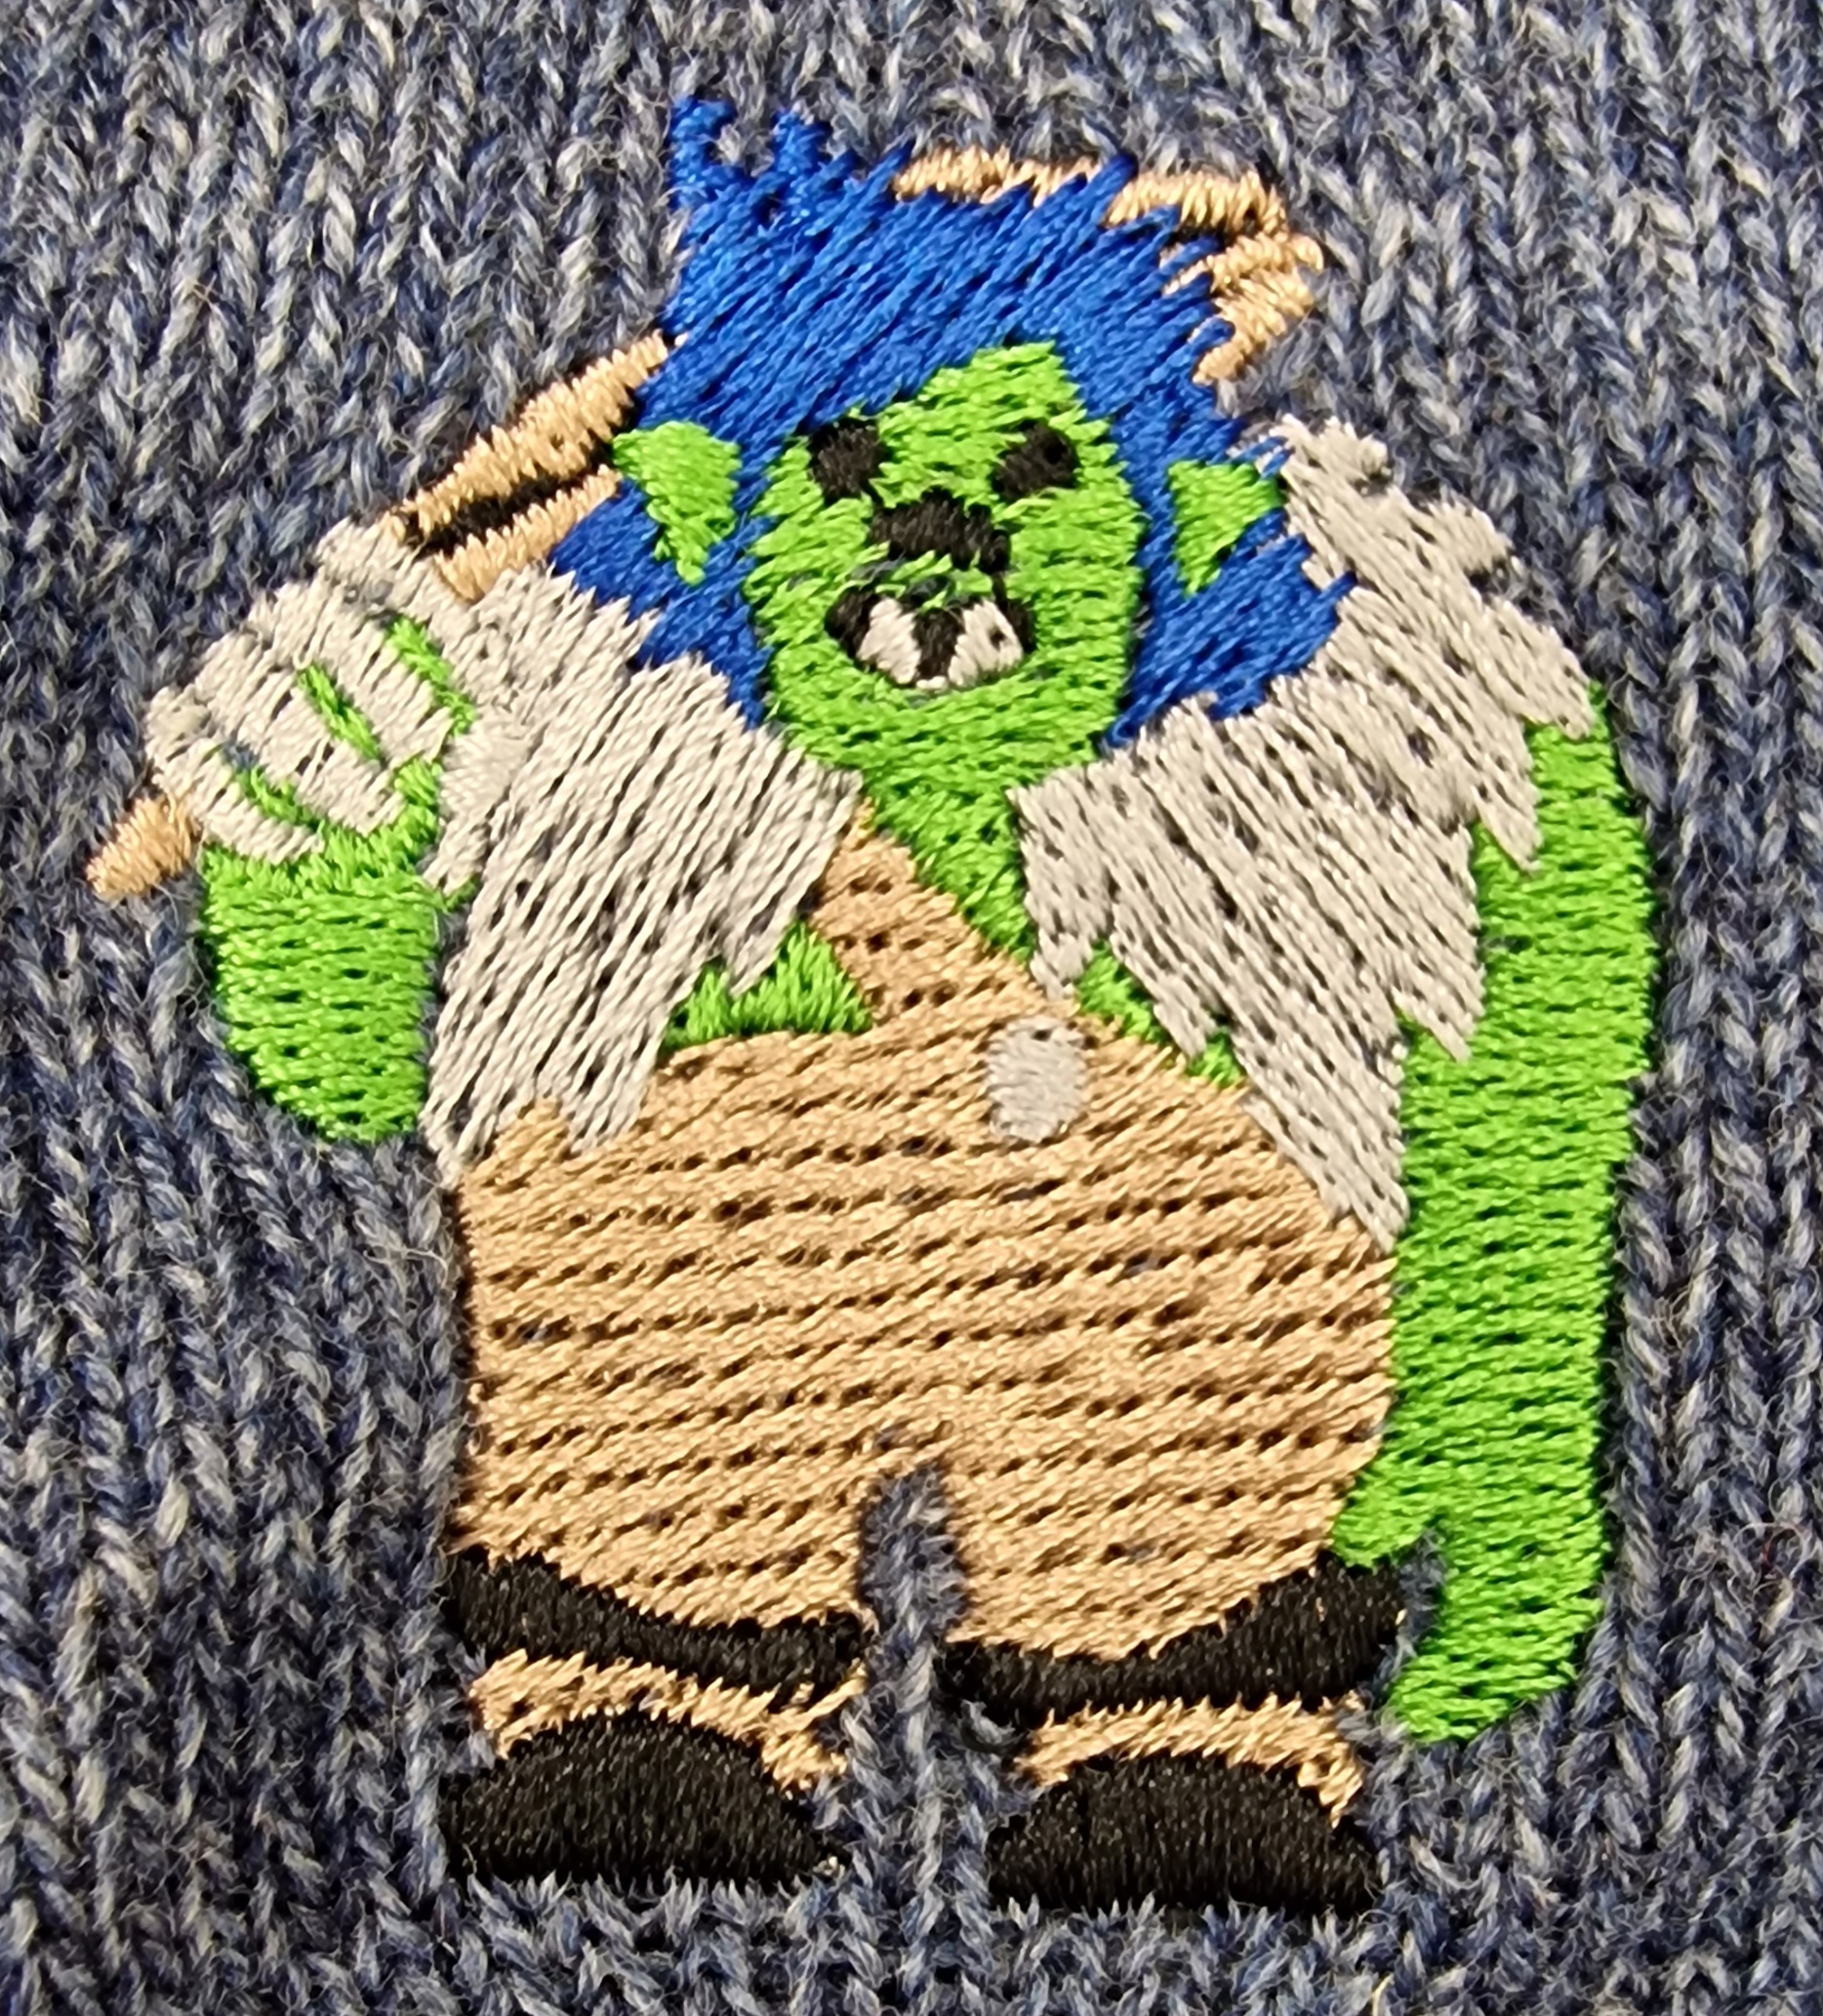
Below we explain the principle explained and tested with the Troll emoji of the Twemoji font of Twitter. | |||
[[image: troll-twemoji.clipart.svg|none|400px|thumb|Emoji SVG, twemoji font|link=Special:FilePath/Troll-twemoji.clipart.svg]] | [[image: troll-twemoji.clipart.svg|none|400px|thumb|Emoji SVG, twemoji font|link=Special:FilePath/Troll-twemoji.clipart.svg]] | ||
Notice: To import this drawing correctly, it was necessary to first break some paths with InkScape (c.f. the section importing SVG) below). In Corel Draw, you can break an object with | Notice: To import this drawing correctly, it was necessary to first break apart some paths with InkScape (c.f. the section importing SVG) below). In Corel Draw, you can break an object with Object->Break curve apart, under the condition the object is recognized as combined object created with Object -> Combine (or equivalent). | ||
The design was made with a lot of superpositions that would normally have to be eliminated, because in embroidery we avoid | The design was made with a lot of overlaps (superpositions) that would normally have to be eliminated, because in embroidery we avoid stitching objects on top of other objects. However, we can stitch satin objects with a slight underlay on top of a tatami. When digitizing with [[InkStitch]] you'd have to do these "subtractions" manually. | ||
[[image:hatch3-coreldraw-5.png|none|thumb|400px|Troll deconstructed twemoji: overlays]] | [[image:hatch3-coreldraw-5.png|none|thumb|400px|Troll deconstructed twemoji: overlays]] | ||
| Line 177: | Line 179: | ||
* Select all | * Select all | ||
* Click on the <code>Convert</code> button | * Click on the <code>Convert</code> button | ||
Here is the result of this automatic digitization (so, we repeat, without preliminary elimination of | Here is the result of this automatic digitization (so, we repeat, without preliminary elimination of overlaps) | ||
[[image:hatch3-coreldraw-6.png|none|thumb|800px|Troll twemoji automatically | [[image:hatch3-coreldraw-6.png|none|thumb|800px|Troll twemoji automatically digitizened]] | ||
Obviously, if we wanted to keep | Obviously, if we wanted to keep superpositions, we could digitize object by object, but it's a bit of a pain. | ||
Now just make some adjustments. At a minimum, I suggest the following: | Now just make some adjustments. At a minimum, I suggest the following: | ||
| Line 204: | Line 206: | ||
* Choose the "simplify" tool and apply. | * Choose the "simplify" tool and apply. | ||
Here is an example of a | Here is an example of a cyclist (man biking) emoji from the Noto font. We selected most objects. | ||
[[image:man-biking-medium-light-skin-tone.svg|none|thumb|600px|Noto | |||
[[image:man-biking-medium-light-skin-tone.svg|none|thumb|600px|Noto font "Man biking" emoji|link=Special:FilePath/Man-biking-medium-light-skin-tone.svg]] | |||
[[image:corel-draw2021-manage-overlaps-1.png|none|thumb|600px|Overlays to eliminate]] | [[image:corel-draw2021-manage-overlaps-1.png|none|thumb|600px|Overlays to eliminate]] | ||
Choose all the elements to flatten (we just avoid the eyes, the mouth and the strap that we will embroider over | Choose all the elements to flatten (we just avoid the eyes, the mouth and the strap that we will embroider over the tatami underneath. | ||
[[image:corel-draw2021-manage-overlaps-3.png|none|thumb|600px|Overlays to eliminate]] | [[image:corel-draw2021-manage-overlaps-3.png|none|thumb|600px|Overlays to eliminate]] | ||
| Line 217: | Line 220: | ||
[[image:corel-draw2021-manage-overlaps-4.png|none|thumb|600px|Overlays removed - thumbs up.]] | [[image:corel-draw2021-manage-overlaps-4.png|none|thumb|600px|Overlays removed - thumbs up.]] | ||
This method removes any overlap. It is therefore necessary to check that Hatch is set for | This method removes any overlap, event very small ones. It is therefore necessary to check that Hatch is set for | ||
* add overlay (default = 1mm in embroidery properties) | * add overlay (default = 1mm in embroidery properties) | ||
* | * adding pull compensation (usually it does) | ||
Finally, in case you digitize semi-automatically, you should '''arrange the order''' of the vector graphics after flattening. | |||
An alternative strategy is to export this image as a very high resolution PNG and semi-automatically digitize it element by detected element as explained in [[Hatch Embroidery | An alternative strategy to simplifying (flattening) is to export this image as a very high resolution PNG and semi-automatically digitize it element by detected element as explained in [[Hatch Embroidery 3 - auto-digitizing]]. | ||
== | == Redigitize elements == | ||
Despite a well-prepared design, the result can be disappointing. In this case, you can re-digitize with the "auto-digitize" tools that we have already introduced above and that are | Despite a well-prepared design, the result can be disappointing. In this case, you can re-digitize with the "auto-digitize" tools that we have already introduced above and that are also used to digitize raster designs (see [[Hatch Embroidery 3 - auto-digitizing|Hatch Embroidery 2 - automatic digitizing]]). | ||
So to | So to redigitize an object you have to: | ||
* Select the embroidery object in question and delete it | * Select the embroidery object in question and delete it | ||
* Open auto-digitize panel | * Open the auto-digitize panel | ||
* Select vector object to | * Select the vector object that you want to digitize again | ||
* Choose the right method | * Choose the right auto-digitizing method, from the choice of "click-to's | ||
Here's an example: the headpiece strap is digitized as a satin by default when a triple stitch would be more appropriate. With an automatic "click-to" digitizing method one can digitize it as a line: | Here's an example: the headpiece strap is digitized as a satin by default when a triple stitch would be more appropriate. With an automatic "click-to" digitizing method one can digitize it as a line: | ||
| Line 244: | Line 249: | ||
== Digitizing relatively complex objects == | == Digitizing relatively complex objects == | ||
The art of digitizing from vector drawings is largely about simplifying the drawings. Remember that the resolution with normal | The art of digitizing from vector drawings is largely about simplifying the drawings. Remember that the resolution with normal thread (weight 40) is 0.2mm. This does not allow to create fine designs. | ||
A second problem concerns the already discussed overlays, a third concerns the complex polygons which often translate badly. This is particularly the case of the icons that can be found on the site of [http://nouproject.org noun project] which contains hundreds of thousands of icons that can be used as clipart. | A second problem concerns the already discussed overlays, a third concerns the complex polygons which often translate badly. This is particularly the case of the icons that can be found on the site of [http://nouproject.org noun project] which contains hundreds of thousands of icons that can be used as clipart. | ||
| Line 262: | Line 267: | ||
The result of the automatic digitization is correct, but requires adjustments. | The result of the automatic digitization is correct, but requires adjustments. | ||
[[image: hatch-coreldraw-7.png|none| | [[image: hatch-coreldraw-7.png|none|400px|thumb|Auto digitize result]] | ||
Here are some quick changes: | Here are some quick changes: | ||
* Changed the fillings of some tatami | * Changed the fillings of some tatami | ||
* Added "hand stitch" effect, especially to some satins | * Added "hand stitch" effect, especially to some satins | ||
| Line 287: | Line 291: | ||
* troll-noto... in [http://tecfa.unige.ch/guides/embroid/emoji/AAA_EMOJIS/people_body/person-fantasy/ this directory] | * troll-noto... in [http://tecfa.unige.ch/guides/embroid/emoji/AAA_EMOJIS/people_body/person-fantasy/ this directory] | ||
Morale: Automatic digitizing of complex drawings may require simplification work before or after automatic digitizing. This is also our experience with other embroidery software. Finally, in 8X8cm automatic | Morale: Automatic digitizing of complex drawings may require simplification work before or after automatic digitizing. This is also our experience with other embroidery software. Finally, in 8X8cm automatic digitizing would probably have given a better result. So the complexity is also to be managed according to the size of the pattern. | ||
=== Import complex polygons === | === Import complex polygons === | ||
| Line 297: | Line 301: | ||
[[image:coral-twemoji.clipart.svg|none|thumb|400px|Twitter Font Coral Emoji|link=Special:FilePath/Coral-twemoji.clipart.svg]] | [[image:coral-twemoji.clipart.svg|none|thumb|400px|Twitter Font Coral Emoji|link=Special:FilePath/Coral-twemoji.clipart.svg]] | ||
[[image:hatch3-coreldraw-8.png|none|thumb|600px| | [[image:hatch3-coreldraw-8.png|none|thumb|600px|Digitizing result]] | ||
This result will probably stitch well, but we can do better | This result will probably stitch well, but we can do better | ||
| Line 305: | Line 309: | ||
'''Break (separate) an object''' | '''Break (separate) an object''' | ||
A composite object | A composite embroidery object can be broken into components, using Toolbox -> Edit Objects -> Break Apart. So we shattered the object, and then with the "Reshape" tool pulled and manipulated the stems at the bottom by deleting points, enlarging the shapes by dragging control points, etc. | ||
Then, we apply "apply closet joins" which brings the entry/exit points closer together. We could do better by creating paths that avoid creating jumps (another time) | Then, we apply "apply closet joins" which brings the entry/exit points closer together. We could do better by creating paths that avoid creating jumps (another time) | ||
| Line 317: | Line 321: | ||
[[image:hatch3-coreldraw-15.png|none|thumb|600px|"Branching" of broken shapes, Hatch shows single object]] | [[image:hatch3-coreldraw-15.png|none|thumb|600px|"Branching" of broken shapes, Hatch shows single object]] | ||
Here is the result | Here is the result. In order to see that an object is "connected" you have to change the display of the sequence. | ||
[[image:hatch3-coreldraw-16.png|none|thumb|600px|result of branching broken shapes, Hatch shows single object]] | [[image:hatch3-coreldraw-16.png|none|thumb|600px|result of branching broken shapes, Hatch shows single object]] | ||
| Line 353: | Line 357: | ||
=== Import from SVG === | === Import from SVG === | ||
For some drawings, the import result is not very good. If this is the case, it is advisable to open to do at least the following | For some drawings, the import result is not very good. If this is the case, it is advisable to open to do at least the following three things: | ||
* break paths that contain separate objects. Normally you should use <code>Object -> Break Apart</code> (CTRL-K) but it doesn't always work. In this case we use "break apart (CTRL-SHIFT-K in InkScape. | * break paths that contain separate objects. Normally you should use <code>Object -> Break Apart</code> (CTRL-K) but it doesn't always work. In this case we use "break apart (CTRL-SHIFT-K in InkScape). | ||
* close open polygons. | * close open polygons. | ||
If you are more proficient in another software, such as Inkscape or Illustrator, use that. I use InkScape | * eliminate superpositions | ||
If you are more proficient in another software, such as Inkscape or Illustrator, use that. I use InkScape most often. | |||
Below and example where we fixed combined path and open polygones | |||
[[image:hatch3-coreldraw-3.png|none|thumb|400px|Hatch 3 with Corel Draw - import errors]] | [[image:hatch3-coreldraw-3.png|none|thumb|400px|Hatch 3 with Corel Draw - import errors]] | ||
[[image:hatch3-coreldraw-4.png|none|thumb|400px|Hatch 3 with Corel Draw - previously edited SVG, correct import]] | [[image:hatch3-coreldraw-4.png|none|thumb|400px|Hatch 3 with Corel Draw - previously edited SVG, correct import]] | ||
Then you have to decide whether to reduce the overlaps | Then you have to decide whether to reduce the overlaps. In most cases you should do so. Don't if you prefer that some objects should stitch on top of each other. Also, you could envision to remove overlaps only for some of the objects. | ||
* The "simplify" tool (Window > Dockers > Shaping) flattens a set of objects (neither InkScape nor Illustrator can do this if I'm not mistaken). See the example of the | * The "simplify" tool (Window > Dockers > Shaping) flattens a set of objects (neither InkScape nor Illustrator can do this if I'm not mistaken). See the example of the biker discussed above. | ||
* Select the objects that should not overlap. In some cases it means all objects, in other cases it does not. E.g. I would not include small objects like eyes, mouth, etc. in the list of objects to flatten down. | |||
Otherwise, it is also advisable to think about reducing the colors. Anyway in InkScape I always work with a reduced palette which roughly matches the embroidery threads I use. To see how to manage colors in Corel and Hatch.... | Otherwise, it is also advisable to think about reducing the colors. Anyway in InkScape I always work with a reduced palette which roughly matches the embroidery threads I use. To see how to manage colors in Corel and Hatch.... | ||
| Line 369: | Line 377: | ||
=== Bugs === | === Bugs === | ||
* Import complex SVG paths (see above) | * Import complex SVG paths often breaks (see above). Workaround: Clean the SVG with InkScape before: In particular break apart objects that have clearly separated subpath like two eyes (CTRL-SHIF-K). Close open curves (most often CTRL-L, i.e. smoothing works). | ||
* Break apart does not work with sub-objects that are in the same path (curve): Solution = use InkScape. This said, these inseparable objects can | * Break apart does not work with sub-objects that are in the same path (curve): Solution = use InkScape. This said, these inseparable objects can digitize well. | ||
* If you make a manipulation without having placed an imported object ( | * If you make a manipulation without having placed an imported object (e.g. pressed ENTER), it is destroyed | ||
* CTRL-Z repeated beyond Corel and Hatch | * CTRL-Z repeated beyond modifications can close Corel and Hatch. | ||
* Same if you import a drawing and try to save the still empty EMB file. | * Same if you import a drawing and try to save the still empty EMB file. | ||
* CorelDraw may crash when opening an EMB file with vector objects. Maybe this is due to switching computers. Before opening the file in question, click on Graphics. I don't know what happens if people don't have this extension. | |||
== Links == | == Links == | ||
* The add-on sales page [https://hatchembroidery.com/coreldraw/CorelDRAW GEM for Hatch Embroidery] has a short video explaining how the integration works. | * The add-on sales page [https://hatchembroidery.com/coreldraw/CorelDRAW GEM for Hatch Embroidery] has a short video explaining how the integration works. | ||
Latest revision as of 00:18, 18 September 2022
[This text was machine translated from french with some slight editing. It needs some extra work]
Intro
GEM for Hatch Embroidery is an "add on" for the Hatch Embroidery embroidery software. It includes the 2021 Standard edition of CorelDRAW (we will use the short "Corel") plus the interface. In Switzerland, its price is $249 including VAT. In France and other countries, it will be necessary to add VAT. A priori, the software can be installed on three computers and be used on one at a time.
This extension allows you to manipulate vector designs and digitize them into embroidery objects. The "standard" edition of CorelDRAW is a good drawing tool. The "add-on" includes an automatic digitizing procedure of the drawing (or selected objects) which includes a mechanism to eliminate large overlaps. Then, you can also use Hatch's auto-digitizing tools to transform vector paths imported into Hatch into embroidery objects. These features are very handy for digitizing logos, emoji or other clip-art in vector format (SVG, AI, CDR, etc.). They are also suitable for graphic designers who prefer to first create a precise design before transforming its elements into embroidery objects.
Compared to software like Stitch Era that integrate drawing software, the features of the "bridge" from CorelDRAW to Embroidery Hatch3 are limited to the essential:
- In automatic conversion mode, you can just select one, several or all vector objects, then request a conversion. Hatch then automatically decides on the arrangement, the type of filling to choose, the removal of any overlaps or not, etc. It also may add travelling lines. Finally, if we preserve the vector objects, we can delete the resulting embroidery object, then use the "click-to-..." procedure to re-digitize (read here ). This is particularly interesting for digitizing certain fine objects with a "center-line" method.
- In semi-automatic digitizing mode, vector objects can be digitized one by one, or in groups. As there is a bug in "Remove Overlaps" which allows to manage overlays in embroidery objects, we advise to manage overlays beforehand in Corel.
A design intended for embroidery is easier to digitize than a design intended for display or printing. After automatic digitizing of unsuitable drawings, many objects will have to be adapted quite extensively. So we suggest to prepare the drawing beforehand. This means, for example, that lines should be drawn as lines and not as thin polygons.
In our opinion, the "CorelDRAW" add-on is very useful in situations where you want to base an embroidery on a vector drawing, either to gain precision, or to be able to recover various "clipart" (icons, fonts, logos , images) or to reuse various drawings. In many situation it is probably best to combine automatic conversion of most elements with semi-automatic digitizing of small element.
A "free" alternative to purchasing this module is to export vector designs to high resolution PNG and then use the semi-automatic method described here. To prepare the drawing and to export vector art to PNG, one can use the software Inkscape (free).
Setup
After purchasing CorelDRAW GEM for Hatch Embroidery we get:
- a link to download Corel Draw
- a product key that you must copy. This key can be found on your online profile (http://profile.hatchembroidery.com).
Installing Corel Draw
The download results in a zip file. To install it you need:
- Unzip the *.zip file in a new folder,
- Go to the /c64 folder and click on Setup.exe
- Choose your languages to install (I prefer to use software in English). If you forget this step, you must restart the installer.
- Indicate the product key when the installer asks for it.
- Register on the Corel site (allows you to recover the software and your key)
Installing the interface with Hatch
- Close Hatch and relaunch it: On launch Hatch 3 will detect Corel and ask you whether to link the two. Say "yes".
Simple use with examples
You can access the drawing module (CorelDraw) via a new "Graphics" button at the top left next to the "Embroidery" button. We will use the latter to return to the embroidery functionalities. These buttons can be hidden in a drop-down menu (under "Home") if you haven't stretched this panel.

There are two methods for digitizing vector drawings:
- Automatic conversion which imports the selected objects by managing overlay, positions, etc.
- Semi-automatic conversion which consists of digitizing the objects one by one with standard Hatch tools.
Of course, you can combine the two methods...
Automatic conversion
We will digitize the "bubbles" emoji (new in version 14) with a procedure that is 100% automatic.

(Media:Bubbles-noto.clipart.svg, download from SVG page, save with CTRL-S in your browser)
The procedure for automatically converting vector objects into Hatch embroidery objects is simple:
- Select all
- Click on
Convert

Hatch complains that it can't convert everything (because there are other objects in the SVG file), but the result is absolutely fine for automatic digitizing:
- Items are sorted in the correct order
- The bubbles in white are in satin, embroidered over the blue background

If we check (default) on Keep, each vector object is in the sequence (at the beginning) and we can therefore re-digitize them differently using the automatic digitizing tools in Hatch (see below). On the other hand, if you want to change the shape, you have to go back to CorelDRAW, modify the element in question, then just digitize this element (don't forget to delete the old embroidery object).
Files: Search bubbles-noto-* (SVG, EMB, PES)
We digitized other simple objects, such as the "pregnant person" emoji. We just changed the texture of the hair:

Files:
- person-pregnant-... files in the folder http://tecfa.unige.ch/guides/embroid/emoji/AAA_EMOJIS/people_body/person-role/ (copyrights in the folder)
Semi-automatic conversion
This method involves importing a drawing (including making adjustments if necessary) and then using the "normal" tools for Hatch's auto digitizing.
We show this method with a "face-with-open-eyes-and-hand-over-mouth" emoticon.

Import
- Here is the image of the drawing adjusted to 45mm. We also adjusted the page size to 5x5cm (Layout -> Document Options -> Page Size).

Instead of using the automatic conversion with Convert, we return to Hatch by pressing the Embroidery button. In Hatch, we now see the same vector objects in the sequence panel (Window -> Dockers -> Sequence or SHIFT+L). In the toolbox on the left (Toolbox) we open the group Auto-Digitize

Digitizing
We proceed more or less as described in the article Hatch Embroidery 2 - automatic digitizing, except that the options are a little more limited. Click-to-fill will not create holes, since the selected element has none. So you have to deal with overlays later.
To digitize a vector object, choose it in the sequence panel, then select the digitizing method. The following image shows digitizing the hand with a tatami mat.

To add an outline around the hand there are several methods. We suggest to use the "add outline method".

Another method is more "manual": select the hand vector object, then select Click-to-Outline in Auto-Digitize tab of the toolbox. Results with a "manual" outline:

Management of superpositions a posteriori
A priori, it would have been more convenient to manage overlays in Corel before moving to Hatch (see later in this article), but here we show how to manipulate embroidery objects. The hand is too large to be embroidered above the face. A priori, the procedure would be a simple click on "Remove Overlaps", but Hatch misses the target, punctures the vector drawing of the face and removes the hand. As a workaround, we used the following method:
- Remove face vector drawing
Remove Overlapsand click on the "hand" embroidery object.

Here in comparison, the result of an automatic digitization with "Convert". We see that the software makes a subtraction for the face, inserts it and then digitizes this version.

The result is just as good in this case, it would just be necessary to adjust the embroidery objects.
Finishing touches
- We digitize the satin eyes: Select the eyes and choose
Click-to-turning-fill - Change direction of hand points
- Change the outline to dark brown and triple stitches.
Here is the simulated result:
Files:
- face-with-open-eyes-and-hand-over-mouth-hatch-... in the folder
Overlap management in CorelDraw and the bridge
One advantage of the CorelDRAW GEM "add-on" is to be able to digitize many precise drawings that exist in proprietary (AI, CDR, WMF) or open (SVG) vector format. The problem is that graphic designers use drawing techniques that overlap elements and we will have to manage that. There are several techniques for dealing with overlays:
- Hatch 3 automatically manages overlaps as already shown, i.e. in automatic conversion the software eliminates large overlaps and keeps small ones which it then digitizes in satin.
- We can have finer control if we take advantage of Corel Draw's features to eliminate them.
- Then we can also eliminate the overlaps at the level of the embroidery objects.
- Finally, you can always redigitize an object in Corel or a vector object imported in Hatch. Importing often modifies the original objects.
Automatic overlap management
Hatch 3 automates the handling of overlapping objects and seems to do a decent job as already seen in the example discussed at the start. However, we regret not being able to specify the management method as in Stitch Era which has three modes: (a) eliminate all overlaps (b) eliminate the important ones (c) eliminate nothing. Hatch automatically takes option (b) and eliminates all important overlaps.
Below we explain the principle explained and tested with the Troll emoji of the Twemoji font of Twitter.

Notice: To import this drawing correctly, it was necessary to first break apart some paths with InkScape (c.f. the section importing SVG) below). In Corel Draw, you can break an object with Object->Break curve apart, under the condition the object is recognized as combined object created with Object -> Combine (or equivalent).
The design was made with a lot of overlaps (superpositions) that would normally have to be eliminated, because in embroidery we avoid stitching objects on top of other objects. However, we can stitch satin objects with a slight underlay on top of a tatami. When digitizing with InkStitch you'd have to do these "subtractions" manually.

With Hatch 3 we proceeded directly to the automatic digitization as in the example above.
- Select all
- Click on the
Convertbutton
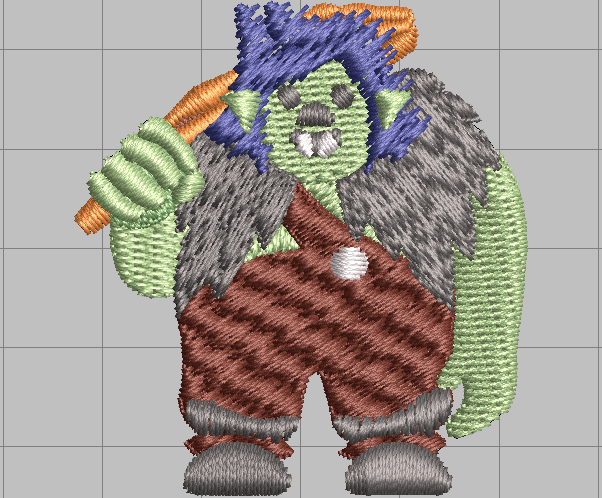
Here is the result of this automatic digitization (so, we repeat, without preliminary elimination of overlaps)

Obviously, if we wanted to keep superpositions, we could digitize object by object, but it's a bit of a pain.
Now just make some adjustments. At a minimum, I suggest the following:
- Increase stretch compensations a bit
- Turn fills into something more troll. I used the "hand stitch" and "feather" effects.
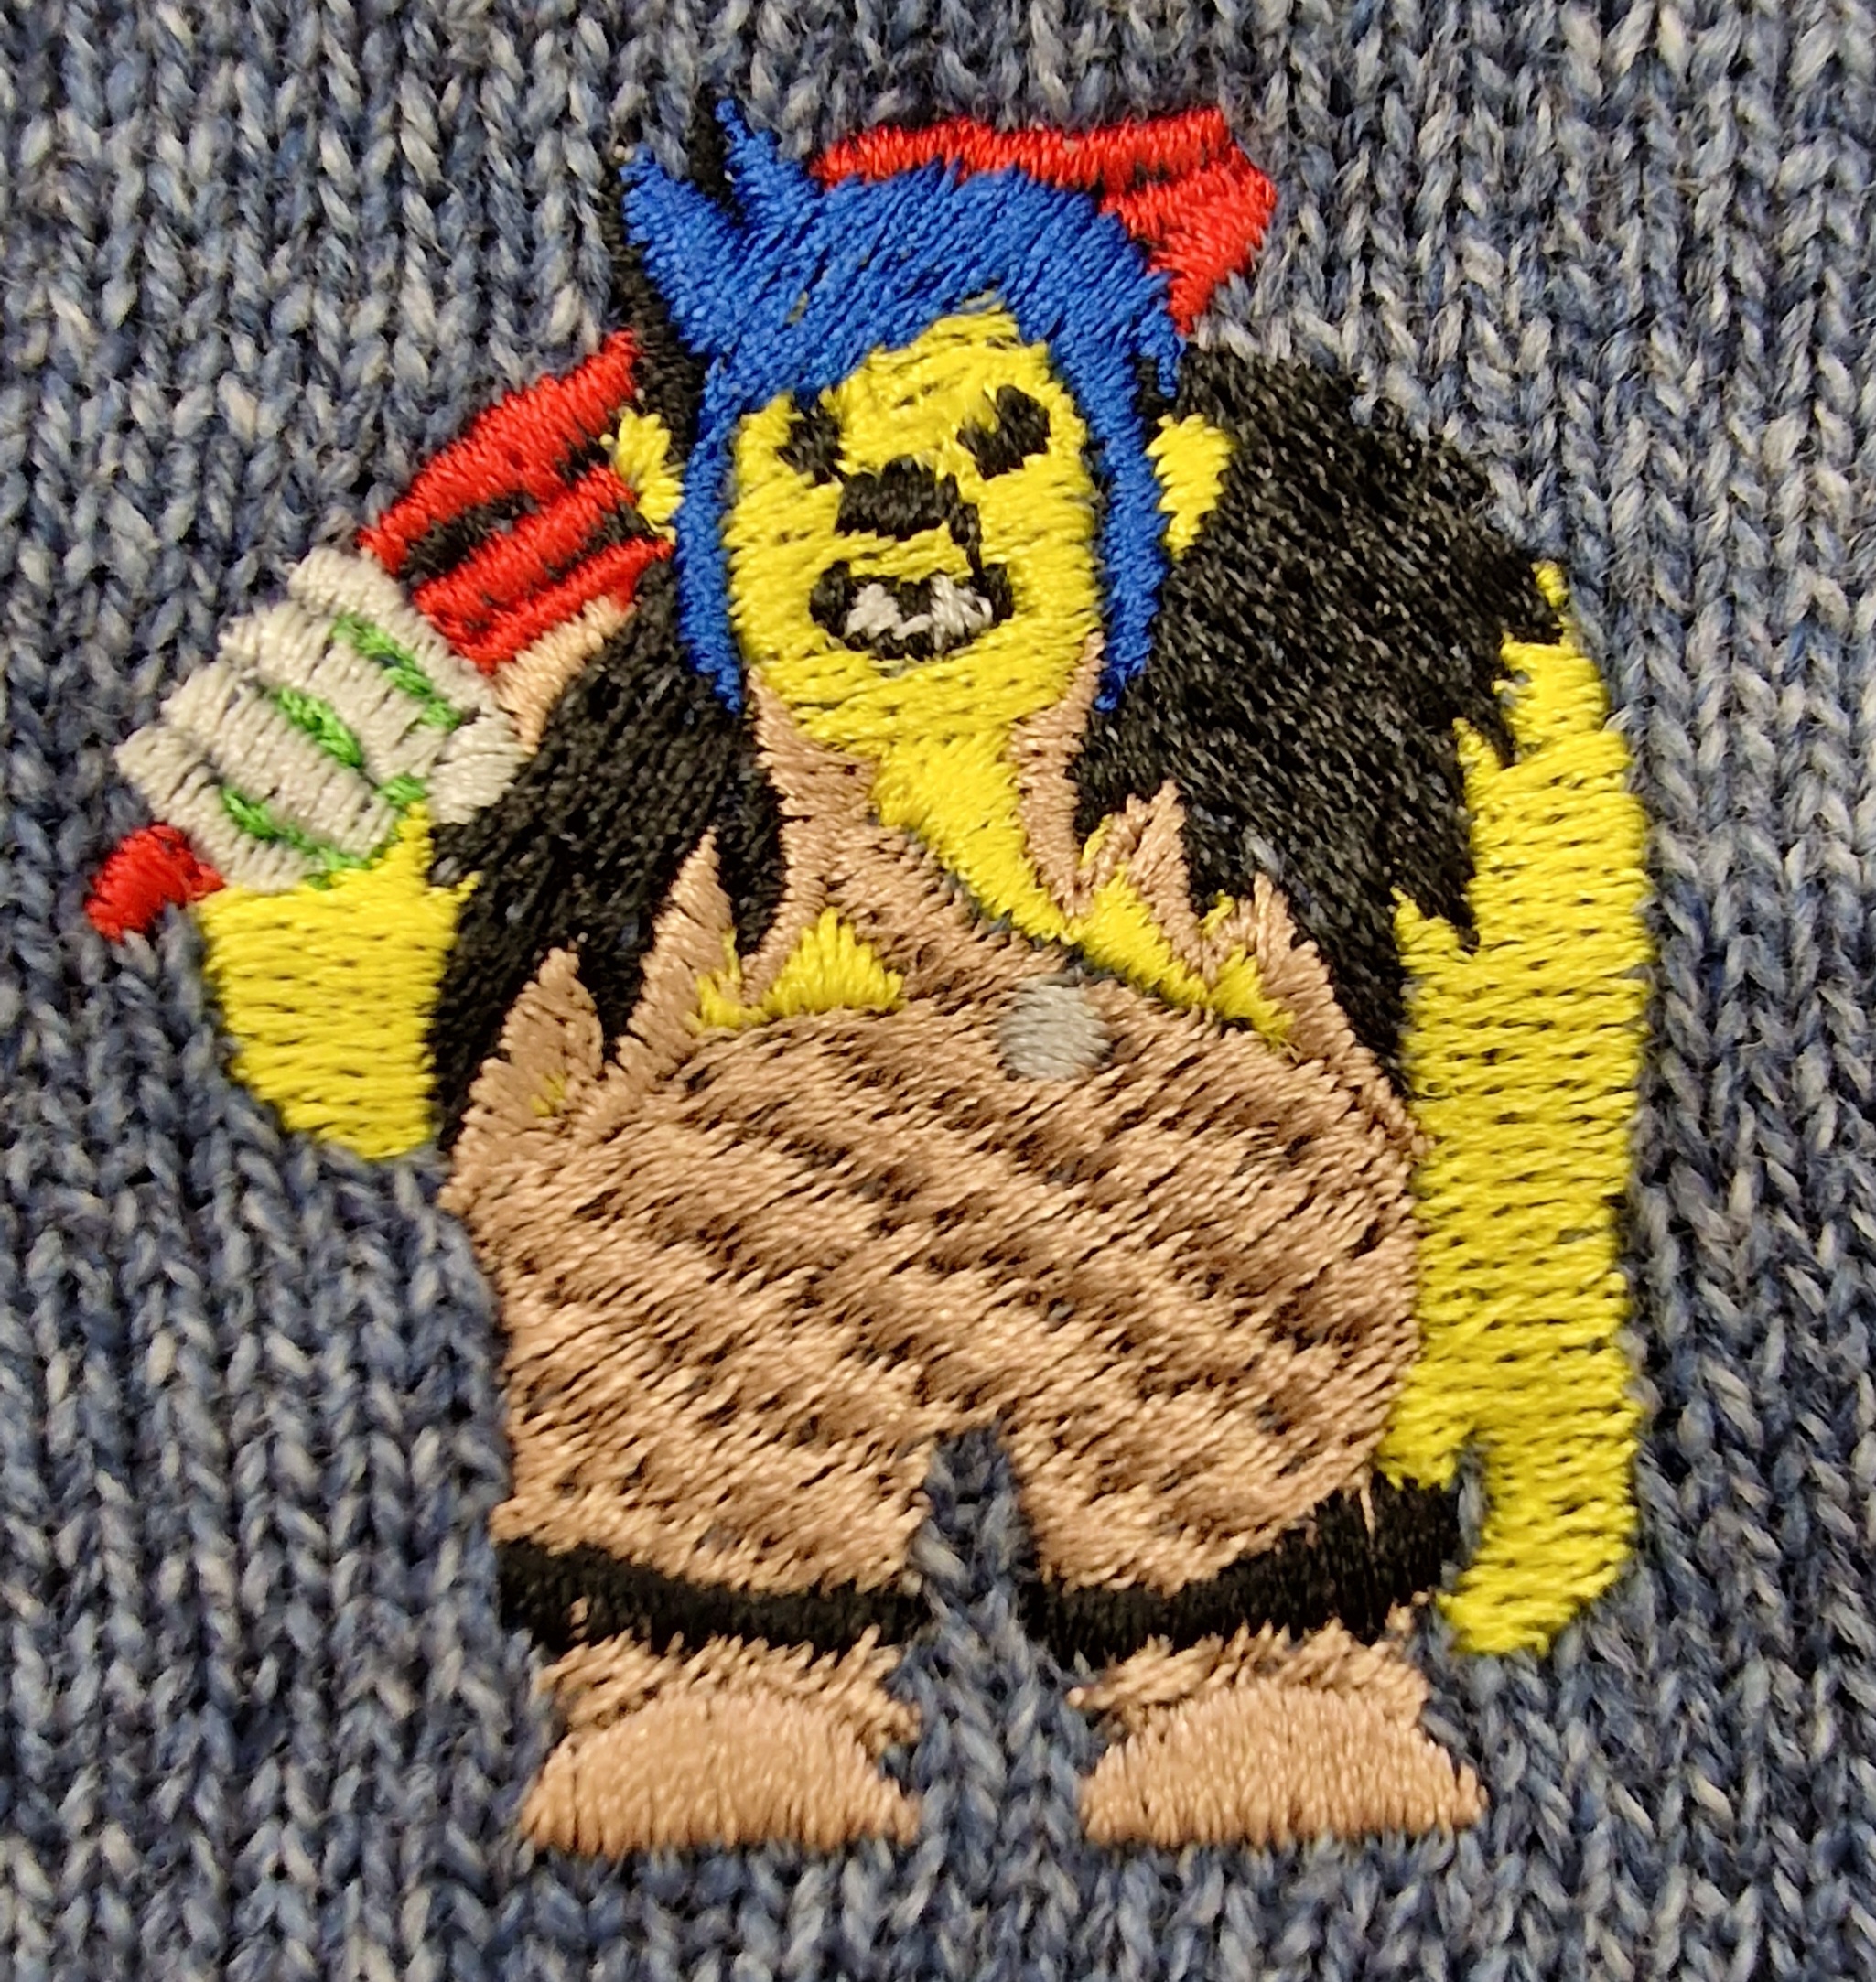
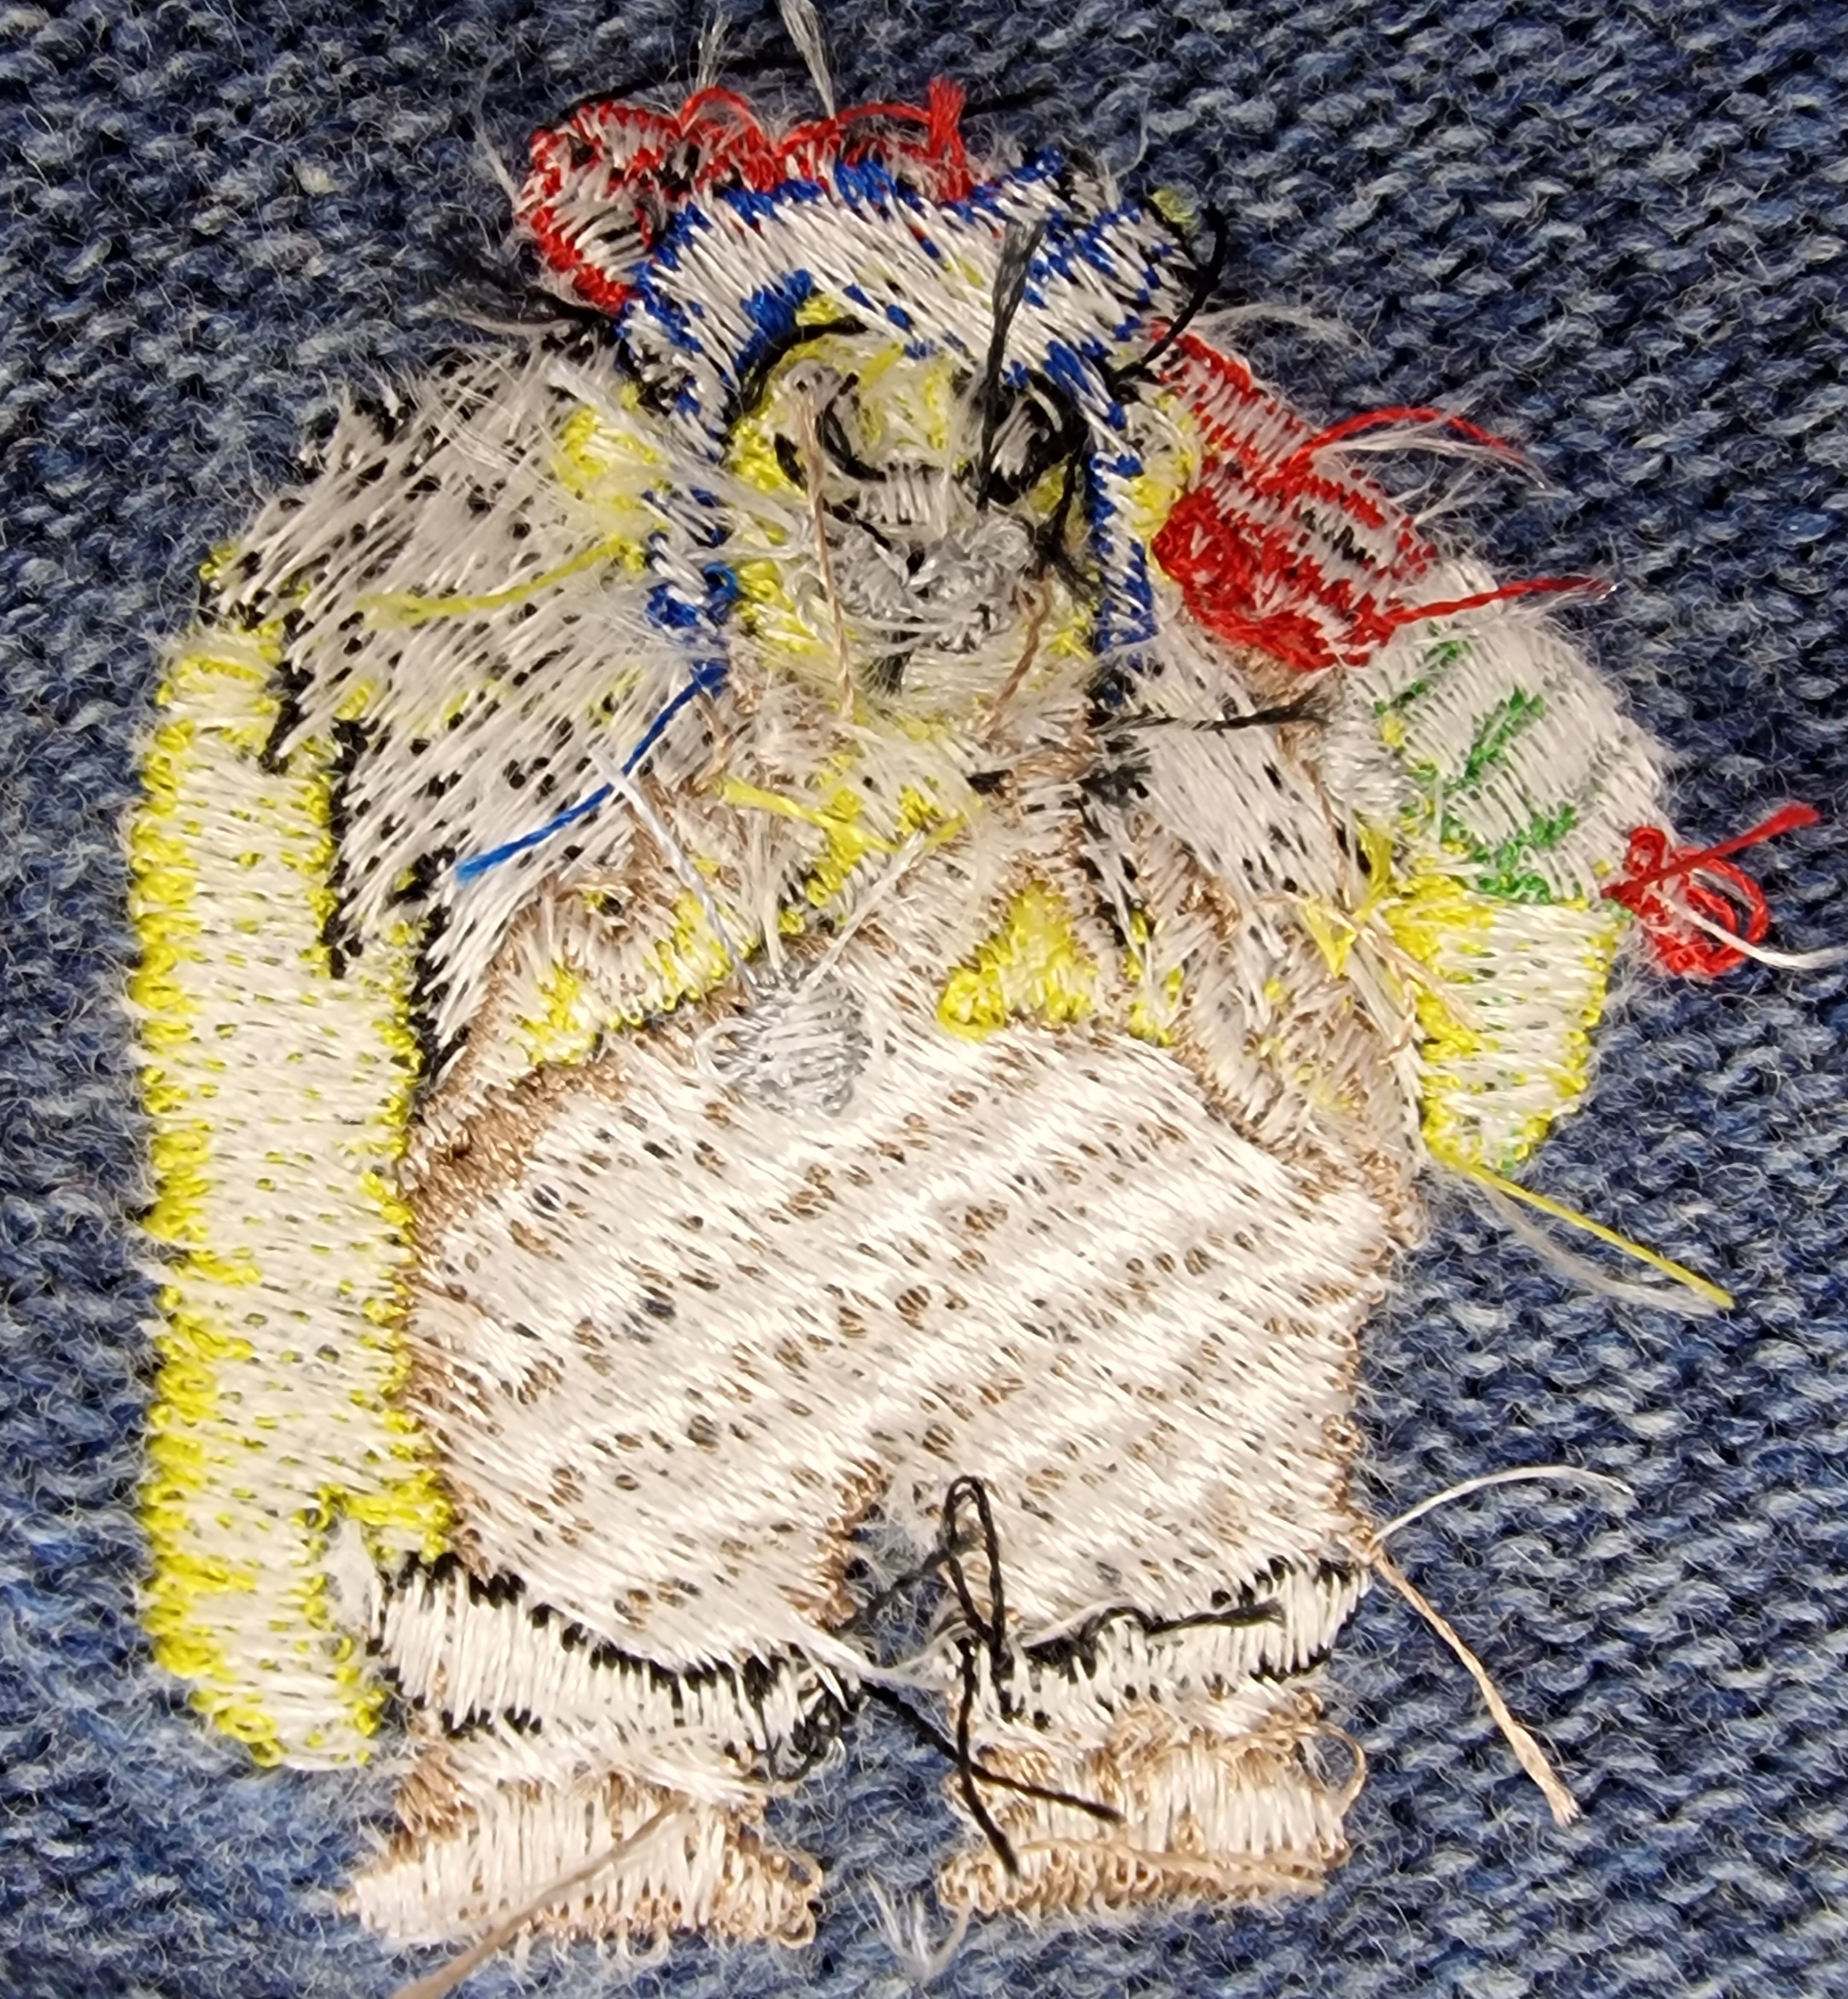
Here is the simulated and embroidered result:


The result is correct, nothing more.
Files:
- troll-twemoji... in this folder
Control overlays in Corel Draw
It was previously shown that Hatch automatically removes large superpositions and preserves small ones. Using this all-in-one strategy sometimes works well sometimes, but sometimes badly. In the latter case, it is advisable to first prepare the drawing in Corel Draw which contains all the tools necessary to simplify.
We particularly recommend the "Simplify" tool which eliminates all the overlaps of a set of paths:
- Select all objects (or a subset)
- Choose the "simplify" tool and apply.
Here is an example of a cyclist (man biking) emoji from the Noto font. We selected most objects.


Choose all the elements to flatten (we just avoid the eyes, the mouth and the strap that we will embroider over the tatami underneath.

Then, choose the Simplify tool: Window > Dockers > Shaping to open the "Shaping" docker.
- Click on
Apply(checking that the right objects have been chosen)

This method removes any overlap, event very small ones. It is therefore necessary to check that Hatch is set for
- add overlay (default = 1mm in embroidery properties)
- adding pull compensation (usually it does)
Finally, in case you digitize semi-automatically, you should arrange the order of the vector graphics after flattening.
An alternative strategy to simplifying (flattening) is to export this image as a very high resolution PNG and semi-automatically digitize it element by detected element as explained in Hatch Embroidery 3 - auto-digitizing.
Redigitize elements
Despite a well-prepared design, the result can be disappointing. In this case, you can re-digitize with the "auto-digitize" tools that we have already introduced above and that are also used to digitize raster designs (see Hatch Embroidery 2 - automatic digitizing).
So to redigitize an object you have to:
- Select the embroidery object in question and delete it
- Open the auto-digitize panel
- Select the vector object that you want to digitize again
- Choose the right auto-digitizing method, from the choice of "click-to's
Here's an example: the headpiece strap is digitized as a satin by default when a triple stitch would be more appropriate. With an automatic "click-to" digitizing method one can digitize it as a line:


Digitizing relatively complex objects
The art of digitizing from vector drawings is largely about simplifying the drawings. Remember that the resolution with normal thread (weight 40) is 0.2mm. This does not allow to create fine designs.
A second problem concerns the already discussed overlays, a third concerns the complex polygons which often translate badly. This is particularly the case of the icons that can be found on the site of noun project which contains hundreds of thousands of icons that can be used as clipart.
Simplify a troll
The Google/Android troll (Noto font) is more complex than the twitter one (see above). A priori, it would be necessary to enlarge the size of the embroidery a little compared to the previous pattern, but we will keep our standard dimensions of 45mm max. high or wide. Overall, auto-digitizing a complex drawing gives mixed results. It is better to simplify the drawing beforehand.

We slightly simplified the original in InkScape (we could also have done it easily in Corel Draw). In particular, we have:
- eliminated small objects, e.g. double pupils, double furs, double buttons,
- enlarged eyes, mouth, teeth.

The result of the automatic digitization is correct, but requires adjustments.

Here are some quick changes:
- Changed the fillings of some tatami
- Added "hand stitch" effect, especially to some satins
- Changed some direction lines

A first version is not convincing: too many details and too many knots as a result. In addition, we forgot part of the hair (Hatch did not digitize an unclosed object).
We have therefore simplified everything in the embroidery module. The hair is one object, only the pupils of the eyes, etc., remain.
New embroidered version. The result is flexible, so it won :)
Files:
- troll-noto... in this directory
Morale: Automatic digitizing of complex drawings may require simplification work before or after automatic digitizing. This is also our experience with other embroidery software. Finally, in 8X8cm automatic digitizing would probably have given a better result. So the complexity is also to be managed according to the size of the pattern.
Import complex polygons
Designers often create sprawling objects by unifying paths. One method to better manage these drawings is to break the objects, before or after importing. Here we will break the embroidery object.
Here's the Coral example (also a new version 14 emoji):


This result will probably stitch well, but we can do better
- either we break this object and adjust the shapes
- either we do some vector surgery, but we couldn't find a manual that explains how to manage these partitions
Break (separate) an object
A composite embroidery object can be broken into components, using Toolbox -> Edit Objects -> Break Apart. So we shattered the object, and then with the "Reshape" tool pulled and manipulated the stems at the bottom by deleting points, enlarging the shapes by dragging control points, etc.
Then, we apply "apply closet joins" which brings the entry/exit points closer together. We could do better by creating paths that avoid creating jumps (another time)

Recomposing a complex object by branching
Finally, we can recreate a composite object. We suggest using "Branching" in the "Digitize" tab and not "Weld" in the "Edit Objects" tab.

Here is the result. In order to see that an object is "connected" you have to change the display of the sequence.

Files:
- "coral-..." files in the folder http://tecfa.unige.ch/guides/embroid/emoji/AAA_EMOJIS/animals_nature/animal-marine/
Basic Corel Draw manipulations
Page size
We strongly advise to define the size of the page, before importing a design and defining the dimensions of your embroidery hoop.
It is possible to save your favorite templates by clicking on the save icon. So for example AAA-50x50mm for a small frame.
- In the English version: Menu Layout -> Page Layout
Display and selection
Zoom:
- Zoom on the whole drawing: F4
Selection:
- Selection of an object in a group: CRTL-click
- Edit nodes: 2nd icon in the tools panel on the left (other tools are hidden below, same logic as at Adobe, so be careful).
Panels
As in many software of this type, many operations are done through specialized panels. Here are the most important:
- Show objects: Window menu->Docker->Objects. Then you have to click on the root which has the name of the file,
- Align and Distribute: CTRL-SHIFT-A opens the panel
- Transformation: ALT-F7
Import from SVG
For some drawings, the import result is not very good. If this is the case, it is advisable to open to do at least the following three things:
- break paths that contain separate objects. Normally you should use
Object -> Break Apart(CTRL-K) but it doesn't always work. In this case we use "break apart (CTRL-SHIFT-K in InkScape). - close open polygons.
- eliminate superpositions
If you are more proficient in another software, such as Inkscape or Illustrator, use that. I use InkScape most often.
Below and example where we fixed combined path and open polygones


Then you have to decide whether to reduce the overlaps. In most cases you should do so. Don't if you prefer that some objects should stitch on top of each other. Also, you could envision to remove overlaps only for some of the objects.
- The "simplify" tool (Window > Dockers > Shaping) flattens a set of objects (neither InkScape nor Illustrator can do this if I'm not mistaken). See the example of the biker discussed above.
- Select the objects that should not overlap. In some cases it means all objects, in other cases it does not. E.g. I would not include small objects like eyes, mouth, etc. in the list of objects to flatten down.
Otherwise, it is also advisable to think about reducing the colors. Anyway in InkScape I always work with a reduced palette which roughly matches the embroidery threads I use. To see how to manage colors in Corel and Hatch....
Bugs
- Import complex SVG paths often breaks (see above). Workaround: Clean the SVG with InkScape before: In particular break apart objects that have clearly separated subpath like two eyes (CTRL-SHIF-K). Close open curves (most often CTRL-L, i.e. smoothing works).
- Break apart does not work with sub-objects that are in the same path (curve): Solution = use InkScape. This said, these inseparable objects can digitize well.
- If you make a manipulation without having placed an imported object (e.g. pressed ENTER), it is destroyed
- CTRL-Z repeated beyond modifications can close Corel and Hatch.
- Same if you import a drawing and try to save the still empty EMB file.
- CorelDraw may crash when opening an EMB file with vector objects. Maybe this is due to switching computers. Before opening the file in question, click on Graphics. I don't know what happens if people don't have this extension.
Links
- The add-on sales page GEM for Hatch Embroidery has a short video explaining how the integration works.