Stitch Era - vector and thread color
Introduction
Dealing with color is fairly easy if your design is simple. You always can decide just last minute, i.e. on your embroidery machine what colors you would like to stitch with. For more complex designs and/or designs with many colors, it's better to plan. This Stitch Era embroidery software tutorial attempts to formulate a few recommendations and tricks. However, we do admit that, so far, we do not have a satisfactory workflow to deal with colors.
Prerequisites:
- You should have some sort of understanding of what vector objects, stitch objects (sections) and generated stitches are, e.g. have read Stitch Era - simple digitizing before.
Disclaimer: This is a first version made in a few hours and I am not sure that I didn't miss something that is important - Daniel K. Schneider 23:31, 23 June 2011 (CEST). Slightly updated in 2017.
Colors in vector art
Color support for vector graphics is in our opinion a bit weak in Stitch Era. While there is support for color selection and basic color palette management, it is very difficult to know what color you are using in a vector object.
In any case, if you import vector graphics from Corel or from Illustrator *.ai via Corel or from SVG via Corel/Illustrator, it's a good idea to get the two following operations done before you inport:
- color coordination
- Simplification of pathes
- Translation of fonts to vector objects (in Illustrator, right-click and Create Outlines
Knowing what color you use
Knowing the color used for an object is relatively easy, but won't help a lot.
- Select the color
Either select
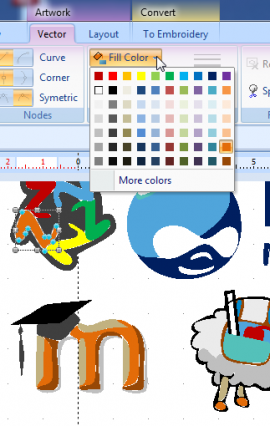
- More colors in the Fill Color or Border Color pull down menu in the main menu bar on top
- or press the Fill Color or Border Color icon to the left near Images panel button (see the arrow in the picture below)
This will give you the color selection panel:
You can see we selected a kind of orange.
Stitch Era supports two color models:
- RGB, defined as amounts of 0-255 Red, 0-255 Green and 0-255 Blue
- HSL, defined as a color number in a color wheel that ranges from 0 to 360 plus saturation and luminosity.
Read the Computer colors tutorial if you need to know more about RGB and HSL colors.
Since the almost exact same color can come in dozens of different shades that your eye cannot distinguish, you must work with so-called color palettes. Else you will wind up with a stitch file that will ask you to change 10 different sorts of bright orange. Read on ...
Color palettes
Unfortunately, there are few standardized and universally used palettes:
- In embroidery world, each thread maker has its own palettes (in the plural)
- For the Internet: HTML 4 defines sixteen colors names. SVG and CSS 3 - based on X11 Color names (Wikipedia) - define a larger set of color names that you can find for example in the CSS 3 color specification. A good overview of both is available in Wikipedia's Web Colors article.
Computer colors are additive colors and follow a logic that can't necessarily be applied to physical colors. For example, some colors cannot be defined by computer color models like RGB or HSL, e.g. metallic colors. Also, in the popular RGB computer model, you will get yellow if you mix green with red. If you mix these green with red pain, you'd rather get some kind of ugly brownish color.
- The only somewhat popular large palette for subtractive (physical) colors are the so-called Pantone colors, but these are not in the public domain and are difficult to get for free. However, not certified subsets of Pantone colors can be found, e.g. at Kamgear. E.g. such a website can tell that "orange" would be Pantone 1585.
Since Pantone colors is a system that was rather made for physical colors we prefer using the "Internet" X11/CSS/SVG color set. The following table was reproduced from Wikipedia and you can only "see" it with a modern web browser.
|
|
| ||||||||||||||||||||||||||||||||||||||||||||||||||||||||||||||||||||||||||||||||||||||||||||||||||||||||||||||||||||||||||||||||||||||||||||||||||||||||||||||||||||||||||||||||||||||||||||||||||||||||||||||||||||||||||||||||||||||||||||||||||||||||||||||||||||||||||||||||||||||||||||||||||||||||||||||||||||||||||||||||||||||||||||||||||||||||||||||||||||||||||||||||||||||||||||||||||||||||||||||||||||||||||||||||||||||||||||||||||||||||||||||||||||||||||||||
Non computer colors on the computer
In embroidery, color effects also can be achieved in other ways
- by over-stitching different colors and by stitching as in the photo-stitch model (see Stitch Era - digitizing complex bitmap images)
- by playing with light effect, e.g. some kind of shading that can be achieved by inserting 3D objects underneath a stitch area or also by turning stitch directions.
These "tricks" can be drawn, but not seen in vector graphics
Physical colors
Colors made with pigments are so-called subtractive colors and don't work like computer colors if you mix colors. Read:
- Mixing Colors Help For The New Artist and People Afraid of Color Mixing (2009)
I frankly don't know what kind of color model would apply when you mix threads, e.g. interweave two threads. Looking at the embroidery closely, you will see two colors, but at distance ?
Using and managing Stitch Era vector drawing color palettes
Stitch Era Universal, when you install it, comes with a single color palette that include too many pale colors for my taste. To see and change this palette:
- Click on the palette icon to the left in the design panel (near the images button(.
- You then can select an item - a so-called swatch - and redefine the color.
- The replaced swatch now will show both in the pull-down menus on top and in the side bar.
I didn't yet create my own carefully planned palette, but at some point I know I should since I really suffer from dealing with too many colors in a design and the resulting messy stitch sections.
Managing palettes
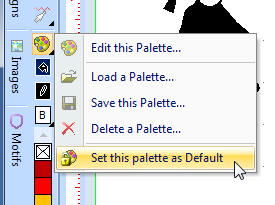
Through the pull-down menu of the palette button (instead of clicking on it) you then can manage your color palettes.
Just for your information, in a vector graphics program like Illustrator, you can add a color swatch by selecting the color you have got in your workspace. This is easier.
Knowing what palette color swatch is used
There are two situations:
1) The color you use is a swatch of the palette. In this case both the color of the drop down menus on top and the swatch inside will take the aspect of your color. E.g orange for a selected orange part as you can see in the picture below.
Unfortunately, you can't see a selected color in the easier to use palette ribbon to the left (one the features that Stitch Era should improve).
2) The color you use is not part of the palette. In this case, only the color of the drop-down menu icon will change. You can see that we select a light blue shape, but in the palette we still see the prior selected orange color ...
We strongly suggest to use only colors of your palette, else it will be very difficult to make sure that colors that look the same are really the same.
Tip
- The only way to insure that colors are the same is - if we understood right - selecting all similar looking colors (good luck) and then to press a swatch that should represent this color, i.e. make sure that all same looking color match the same swatch, in other words: a precise RGB/HSL definition.
Stitch Era also should implement sorting of vectors by color as they do for stitch sections. Or maybe create some reporting tool.
Colors in the Art-to-Stitch process
If you digitize a whole vector drawing through "Art to Stich" (intelligent) which we recommend in this context, then there is way of assigning vector colors to needle colors.
In the popup window, select the Needle settings tab and tick "assign artwork colors to needdles ....". Then use the pull down menu. I suggest using option 2 "Do not use (skip) the lowers needles" or option. “Start using needle # and redefine needle colors according to the artwork colors. Using this strategy a new needle palette will show you at bottom of the box.” or use option 4 “Assign artwork colors to needles and/or change needle colors manually. From Color Assignment box you can change manually the color needles by clicking on the selected one.” (p 9-5 of the manual).
The little pull-down color-palette menu to the left of the workspace on top of the needle palette can be used to assign manufacturer's thread numbers to colors (see below for more details). Unfortunately not all thread makers are in there, e.g. Durak is missing.
Colors in stitch sections
Colors in stitch sections are defined by needle number which in turn does have an associated color. In principle, you should associate a thread color that you have got and we shall see how to do this. Information below will have to be updated to Stitch Era 17.
Assigning colors to needles
When you translate from vector graphics to needles, Stitch Era needs to know what needle number to assign to each color.
Assign real thread colors to needles
- Select the Needle Settings tab in the Image to Sections popup window that you should see when you use an auto-digitizing procedure (art to stitch).
- Tick "Assign artwork colors ...." (last item) and click on the palette item next to a needle
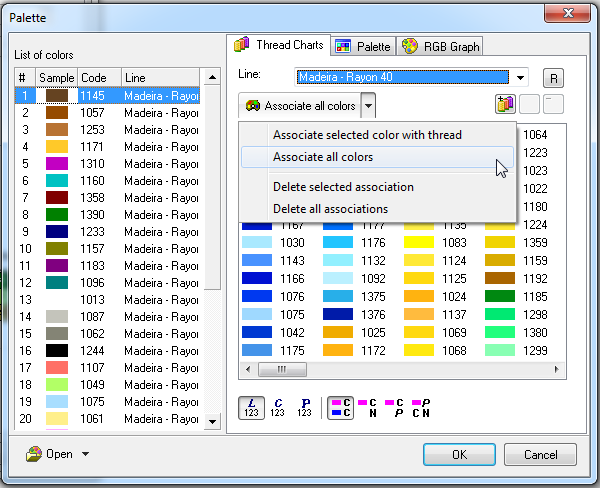
- Use the the Line: pull-down menu to identify your brand of threads (e.g. I use Maderia Rayon)
- Use to the pull-down menu to Associate All Colors
- You then still could fine tune, i.e. change color shades to threads you really own. To do so, use the pull down menus next to each color (see the previous screen capture).
Warning: Do not click on OK before you are done defining the other settings, i.e. leave the Image to Sections popup window open after defining the colors to needles settings and move on to defining the Stitch Settings in the third tab. Typically you might want to lower the default density.
After digitizing:
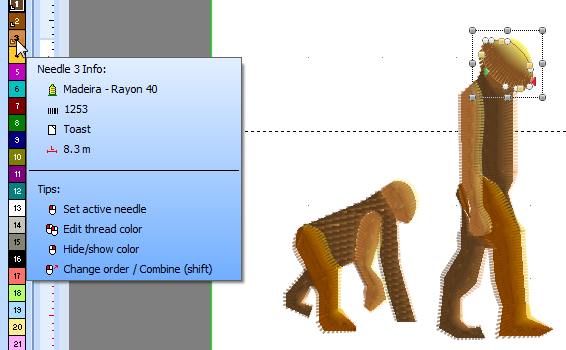
- If you glide your mouse over a needle item in the palette to the left (do not click!) you will see what Madeira thread you will be asked to use later (hopefully). As you will see the color names are Madeira's (i.e. no RGB code), but there is nothing we can do about this we believe.
- Have a look at the tips. They should be self-explaining. I.e. you now can still make changes.
Optimizing needles
Group needles together
If you did things right, you will see all the needles that you will use in on sequence. But maybe you didn't....
- Click on the Optimize needles button as shown below
As you can see, we got all colors nicely ordered, except that we have two dark greys and two dark red variants and we will deal with this without going back to vector art.
Order stitch sections by needles (optional!)
Not let us optimize needles, i.e. make sure that we don't have to change needles twice for the same color. Professionals would not do this. It can mess up carefully design stitch orders:
- Sections that should be on top of another will be stitched the other way round
- You may get inefficient jump stitches
- Pull/push effects may be worse (in case you thought about stitching carefully a bit all over the place)
But since we create non-professional embroidery, minimizing our work is more important. However, we shall have to do some manual repair later.
You may use the Sort Objects -> Sort objects By Color tool in the Embroidery tab as shown below
- You could just sort by needle number (and that's what I usually do)
Merging needles with similar colors
Since your machine only has 10 colors like our Brother PR1050X or since you don't want to change threads all the time, you may want to use a single thread for very similar colors.
There exist two situations: Either you just want to fix the color of a few stitch areas, or have to deal with a few dozen little areas that look the same but are assigned to different needles.
Small changes
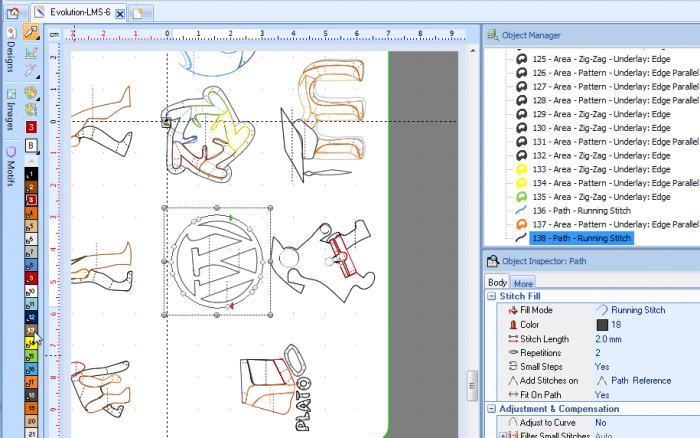
As you can see in the following picture, we got a lonely running stitch (blame on me that uses Needle 18). It should have used needle 13 (same color as the fill). To fix that, just do the following.
- Select the section (if it is not already)
- Click on the needle in the palette, e.g. in our case 13.
Then repeat as above:
- Optimize needles
- Order sections by color if you wish
Finally, I suggest to immediately repair the vector design and make sure that all similar looking colors do have the same color, i.e. a single one for dark grey. You never know whether you will digitize the vector design (or parts of it) again.
Merging just two colors
Let us assume that you got two similar colors that you plan to merge, e.g. some kind of grey in position 1 and some other kind of grey in position 11:
- SHIFT-Drag the #11 color on top of the #1 color in the palette to the left. (Shit-Drag means: put your finger on the SHIFT key, then hold down the left mouse button and drag.)
Assembling many stitch areas into one color
There are different ways to do this, e.g. if stitch order is not important, in short, do this:
- Optimize needles (pull down palette menu in the left bar)
- Sort the colors so that similar ones are next to each other (embroider tab > Sort objects), then move the similar color groups next to each other as explained above
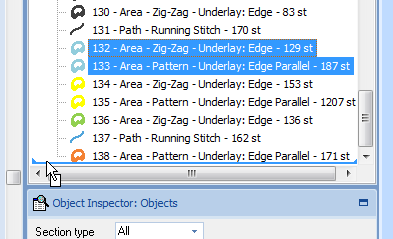
- Select a range of similar color sections in the object manager panel, then click on a needle...
Fixing final stitch order
Since we optimized stitch order before, we now should fix in which order sections shall be stitched. For some designs, this can be a lot of work, however, often it just means dragging items down in the object manager. Down means being stitched later.
You may consider moving around a whole set of colors first (still adopting the principle that changing threads is a pain...). In that case you can either use the object manager or the Order stitch sections by needles tool.
In the object manager:
- Use either CTRL-click to select a series of sections to move or us SHIFT-click to select a range.
- Then drag this up or down.
In order to make sure that your design is ok,
- Use at least the 3D view in Stitch Era or even play the sequence manually or automatically
- You also can use another viewer, e.g. I recommend My Editor as explained in Using other software to look at your design
Btw. the picture shows part of a project for conference embroidery. I.e. stitch ideas all over a shirt in order to attract people while wandering around in a conference hall.
Links
- Thread color lists
- Thread Chart information (best site I found)
- Pantone and RA
- Links to Various Thread Charts for Machine Embroidery (long list)
- Conversion charts and tools
- Embroidery Thread Color Conversion Charts at RedRockThreads.com
- PANTONE Color Match (type a pantone number and get the Madeira color).
Brand-specific
- Robinson-Anton (RA)
Acknowlegments
For the color table
- Web colors (Wikipedia)
- Tips and hints: Ian "zoom monster" and Ken Hecker from the Yahoo Stitch Era group
Content of this article has been taken from EduTechWiki (en) or EduTechWiki (fr) at the date indicated in the history. DKS was the main founder and main contributor of EduTechWiki. If you cite this page you also must cite and credit EduTechWiki, according to the CC BY-NC-SA license. View the pageinfo-toolboxlink for this article.


