Reload Editor Tutorial
Definition
This is a short Reload Editor Tutorial. The 2006 version - 2.5.5 cross-platform Install - includes support for IEEE LOM, IMS MD 1.2.4, IMS CP 1.1.4 and SCORM 2004 (3rd edition) specifications.
- Learning how to assemble IMS Content Packs is fairly easy.
- Editing Metadata too.
- I am not sure that SCORM 1.2 or 2004 editing with this tool is for the masses. See SCORM 1.2 for some alternatives. I don't know of any easy SCORM 2004 editor (please help me)
- Editing IMS LD isn't easy either. Also, end-user ready players are still missing.
- Daniel K. Schneider 16:38, 29 March 2008 (UTC)
For starters, always make sure that you select the right editing mode when you create a new package.
Reload Editor IMS CP Tutorial
This is a short "how to" for the IMS Content Package/Scorm editor based on the 2-page Reload Editor Step by Step Guide.
Prerequisites and Introduction
Read through everything quickly before you start doing it. In particular, read the last item about editing existing content packages.
Make sure that you first understand what IMS Content Packaging means. This e-learning standard:
- allows you to author and distribute learning contents as a zip package to be imported in an LMS
- these contents are arranged for viewing through a simple hierarchical menu.
Note: Most authoring tools (including this one) also allow you to produce a zipped directory with files that can be deployed on a simple webserver, a CD etc.
Starting a content package
- Put all the resources (e.g. HTML and picture files) you plan to use in a directory.
- You may use subdirectories.
- You later may add other materials, but it's more practical to start with this step
- A word of warning: Since a simple Content Package organization id organized as a hierarchical items structure and since an LMS (or the previewer) will display this tree you better refrain from using pages that implement links to each other.
- Open the Reload Editor Software
- See Reload Editor for some installation hints.
- Create a New IMS Content Package
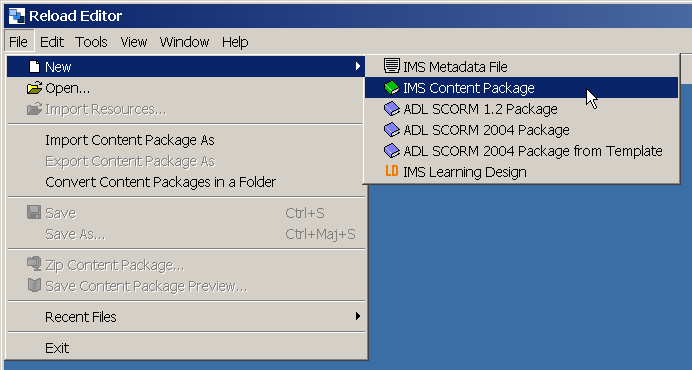
- Select File, New, IMS Content Package. You will be asked to select a new folder to store your package in. Select the resources directory you create above.
Getting familiar with the panes and the three main elements of the manifest
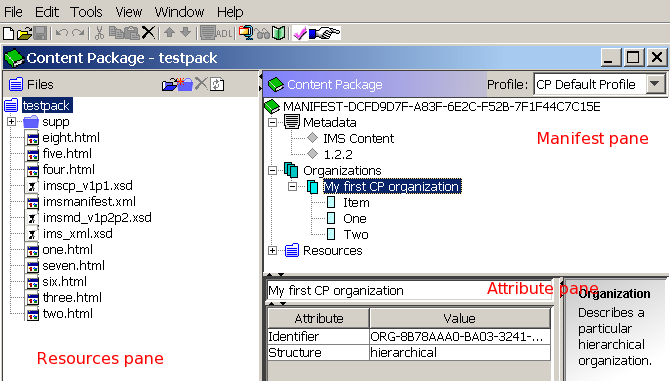
- The main Reload Editor window has three editing panes (look at the picture above) :
- The Resource Pane on the left lists all the resources that will be distributed with your content package and that you can use to define a a learning organization (i.e. content structure that a learner will see).
- The manifest pane on the right will allow you define both meta data and a learning organization.
- The Attribute pane (right bottom) will allow you fine tune things. For starters you only will use it to change titles of items (see below).
- Edit some metadata that will describe your package.
- Right-click on "Metadata" in the manifest pane".
- Keep it to a minimum for starters. You don't need to fill in anything if you don't want to...
- Add an organization
- An organization will contain the learning sequence, i.e. it is here that you will define what contents learners will be exposed to !
- Right-click on the organizations element in the manifest pane and select Add Organization from the menu which appears.
- Usually, a content package will only contain a single organization (since most LMSs can't handle more than one).
- You may change it's title from organization to anything you like. To do so, change "organization" in the attribute pane below (but do not change attributes and values!)
- All the content we add to our Content Package will be added to this Organization as Items (see below).
- Do not worry about Resources element right now. For simple Content Package editing you will not need this! .
Adding contents to your organization
- The easy way
Drag individual files for inclusion in the Package from the Resources pane onto the Main Organization node in the manifest pane.
- As you do this, they will appear as new Items. Titles will be taken from HTML pages if present, though you can include non HTML content such as spreadsheets and PDF files as well.
- The files (and any files which Reload identifies as associated, e.g. images and stylesheets that are used by an HTML file) will automatically be added to the Resources element. Therefore again: do not manually edit the resources elements.
- You may change the title of an item by clicking first on the item (below your organization) and then by editing the text input window of the attributes pane.
- Reorganization of items
- You can move items up and down by right-click + move up/down
- You can move items into items (so they become sub-items) by dragging them with the mouse.
- Adding contents the hard way
On some occasion, the drag-and-drop method from the resources pane to an organization is not the best way to do it. Instead,
- Drag an item from the resources pane into Resources of the Manifest pane
- Next, create a new item in the organization or decide whether you want to associate a resource with an existing empty item.
- Click on the item
- Select from the value of the Reference element the resource you want to associate.
Adding new resources
- Adding materials
If you need more resources you can import these by clicking on the import "open folder" icon in the resources pane. It can import whole folders and sub-folders (so be careful).
- Import Resources (either click on the icon or select from the File Menu)
- If you tick Include dependent files you will get all depend files. This may be a bit adventurous if it's an HTML with plenty of links. But it's very practical to include multimedia contents.
- Just include the resource without dependent files if you are not sure whether you have forgotten to remove a link ....
- Alternatively you can drag and drop from the file manager (only tested with Windows): Drag a file on top of a folder name (only!). That can be either a subfolder or the the root folder on top which will have the name of your CP.
- Adding links to external resources
- You also may add links to external resources, e.g. this wiki :).
- To do so we first suggest to create a new item in the organization. Right-click on organization and "add item". Then, add a resource to the resources in the manifest pane.
- Right click on resources and "add resource"
- Edit the HREF attribute in the attributes pane
- Click (left-click) on your new item you created (make sure that is highlighted).
- Click on the empty value slot next to referenced element' in the attribute pane. A menu will pop up from which you can select the resource you just added. Wow !
Note: This is almost the same procedure as " Adding contents the hard way" described above.
- Delete unused resources
You should delete unused resources from the resources pane (right click) because all resources will be distributed with the content pack.
Previewing
- Save your Content Package
- Click on the "preview icon" in the top menu bar (or alternatively "View -> Preview Content Package").
- Deployment of your Preview
- If you wish to deploy this preview in a traditional web server, you can "File -> Save Content Package Preview" into a folder (do not use the same folder !!).
- Then just copy the folder to your web server.
Saving as zipped content package
- Make sure that you added some minimal metadata, e.g. authorship and copyright.
- Do "File -> Zip Content package" or click on the "archive icon".
- Import into an LMS.
Editing existing content packages
You may download a test package from the reload web site or you may find them on the web (but be careful, some of these will be badly done and not load)
- To (re)edit your own content package
- simply "File -> Open", select the directory of your content package and click on the imsmanifest.xml file.
- This file contains all the information you can edit with this tool. If you wonder why, read the IMS Content Packaging article.
A last word of warning: This small "how to" explained how to build a simple IMS CP learning sequence. Building a SCORM 1.2 organization is a bit more complicated, read on.
Reload SCORM 1.2 Tutorial
This tutorial is not yet complete. Creating SCORM packages only make sense if there are quizzes...
Prerequisites and Introduction
Creating a SCORM 1.2 organization is a fairly similar process. Firstly make sure that you know how to add items to an organization by drag/drop (see above).
Let's also recall the major differences between simple IMS Content Packaging and SCORM 1.2 Content Aggregation packages. Read this SCORM article if you didn't already do so.
- Metadata can be described in an external file (instead of being part of the imsmanifest.xml)
- There are two sorts of resources: resources
- SCORM packages utilise 5 extra elements which provide information on how the package behaves. These five elements are Prerequisites, Max time allowed, Time Limit Action, Data from LMS, Mastery Score
Notice: SCORM Packages can also be used just to store and transport content as 'assets' for future use. In this case there won't be any Organization, but we will not deal with these simple SCORM resource packages here.
Starting a SCORM 1.2 package and organization
The principle is exactly the same as for an IMS Content Pack. The only difference is that in order to create a SCORM 1.2. pack, you have to say so when you create a new package. Select:
ADL SCORM 1.2 Package
To add resources, either copy them into the same directory or import (as described above)
The Organization
Adding items to the organization also is done the same way as for IMS CP.
- The most practical way to do it is to drag a resource from the left resources pane into an organization, i.e. either on top of the organization icon (to make it a top level element) or else on top of an item. This way the resource and all the resources that depend on it will automatically be added to the resources tree.
- Then you also may create items that are without direct resources. Right-click on the organization and add item. E.g. you create emtpy items in order to insert sub-items or else to manually add a resource later on, e.g. the URL.
Creating SCO items
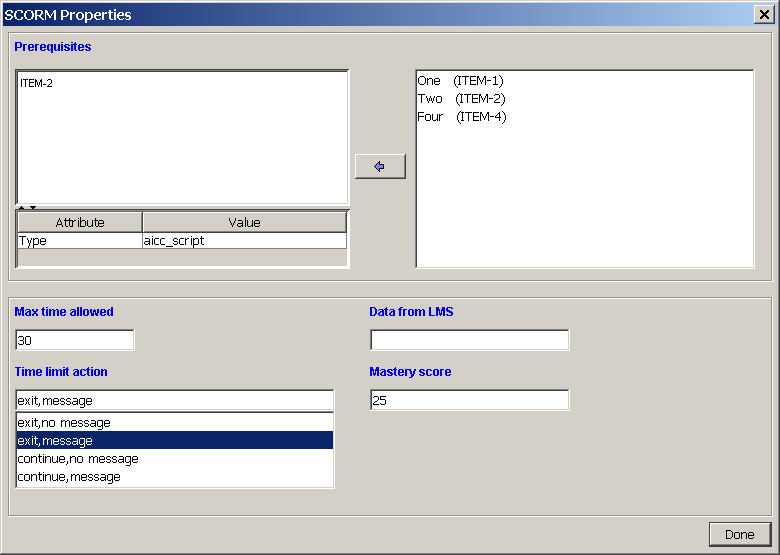
This is where things differ. Basically, a SCO (Sharable Content Object) is like a normal IMS CP item plus extra information. To add "SCORM information" to an item you right-click on an item and select ADL Edit Scorm ..... Alternatively, select an item (left-click) and press the ADL icon on the menu bar on top.
In the SCORM Properties panel that will open you can then define the five kinds of AICC/CMI extentions: Prerequisites, Max time allowed, Time Limit Action, Data from LMS, Mastery Score.
- Prerequisites
This element defines any other Item which the learner must have completed satisfactorily before they are allowed to access the current Item. There can be multiple routes through learning materials.
- Maxtimeallowed
This is the time (in seconds) that a LMS would permit access to the item for. For instance you may wish to restrict access to a simple assessment, forcing all learners to complete within 15 minutes.
- Timelimitaction
This is the action specified if the 'max time allowed' is exceeded. The user is provided with a choice of four built in actions:
- Exit, no message,
- Exit, message,
- Continue, no message,
- Continue, message.
- Datafromlms
This element allows initialisation data to be sent from the LMS to the Item on launch. (not too clear to me yet - Daniel K. Schneider)
- Masteryscore
This is a normalised score (between 0 and 100) which must be achieved to indicate satisfactory completion of an item.
- Asset vs. SCO items
SCO items have a "." in the icon. In the example to the left, this would be item Three. In older Reload Editor versions, one also could see SCORM properties as sub-items. (Daniel K. Schneider doesn't know how to "un-SCO-fy" an item without editing the xmlmanifest.)
SCORM 2004 and IMS LD
... missing chapters (sorry).
Links and references
- The help of the Reload Editor
- http://thedesignspace.net/MT2archives/scorm/index.html
- Reload 1.3 Manual - PDF) 2004, still useful !
- Reload Editor Step by Step Guide, a 2-page quick guide (very useful)
- Example Content Packages and Content
- http://www.claroline.net/doc/en/index.php/How_do_I_create_SCORM_content%3F
Content of this article has been taken from EduTechWiki (en) or EduTechWiki (fr) at the date indicated in the history. DKS was the main founder and main contributor of EduTechWiki. If you cite this page you also must cite and credit EduTechWiki, according to the CC BY-NC-SA license. View the pageinfo-toolboxlink for this article.


